IBM 8480 Hardware Maintenance Manual - Page 69
Replacing, cover
 |
UPC - 087944878070
View all IBM 8480 manuals
Add to My Manuals
Save this manual to your list of manuals |
Page 69 highlights
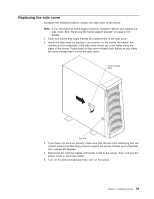
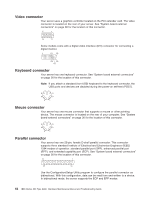
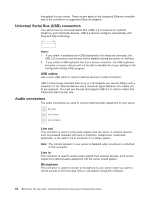
Replacing the side cover Complete the following steps to replace the side cover of the server. Note: If you removed the frame-support bracket, reinstall it before you replace the side cover. See "Removing the frame-support bracket" on page 41 for details. 1. Clear any cables that might impede the replacement of the side cover. 2. Install the side cover by placing it into position on the server. Be certain the notches on the underside of the side cover match up to the holes along the sides of the server. Press down on the cover-release latch button as you close the cover-release latch to lock the side cover. Cover-release latch Key lock 3. If you have not done so already, make sure that the two front stabilizing feet are rotated outward so that they properly support the server. Rotate each individual foot outward 90 degrees. 4. Reconnect the external cables and power cords to the server; then, connect the power cords to electrical outlets. 5. Turn on the attached devices; then, turn on the server. Chapter 4. Installing options 59
-
 1
1 -
2
-
3
-
4
-
5
-
6
-
7
-
8
-
9
-
10
-
11
-
12
-
13
-
14
-
15
-
16
-
17
-
18
-
19
-
20
-
21
-
22
-
23
-
24
-
25
-
26
-
27
-
28
-
29
-
30
-
31
-
32
-
33
-
34
-
35
-
36
-
37
-
38
-
39
-
40
-
41
-
42
-
43
-
44
-
45
-
46
-
47
-
48
-
49
-
50
-
51
-
52
-
53
-
54
-
55
-
56
-
57
-
58
-
59
-
60
-
61
-
62
-
63
-
 64
64 -
 65
65 -
 66
66 -
 67
67 -
 68
68 -
 69
69 -
 70
70 -
 71
71 -
 72
72 -
 73
73 -
 74
74 -
75
-
76
-
77
-
78
-
79
-
80
-
81
-
82
-
83
-
84
-
85
-
86
-
87
-
88
-
89
-
90
-
91
-
92
-
93
-
94
-
95
-
96
-
97
-
98
-
99
-
100
-
101
-
102
-
103
-
104
-
105
-
106
-
107
-
108
-
109
-
110
-
111
-
112
-
113
-
114
-
115
-
116
-
117
-
118
-
119
-
120
-
121
-
122
-
123
-
124
-
125
-
126
-
127
-
128
-
129
-
130
-
131
-
132
-
133
-
134
-
135
-
136
-
137
-
138
-
139
-
140
-
141
-
142
-
143
-
144
-
145
-
146
-
147
-
148
-
149
-
150
-
151
-
152
-
153
-
154
-
155
-
156
-
157
-
158
-
159
-
160
-
161
-
162
-
163
-
164
-
165
-
166
-
167
-
168
-
169
-
170
-
171
-
172
-
173
-
174
 |
 |
