IBM 9114-275 Installation Guide
IBM 9114-275 - IntelliStation POWER 275 Manual
 |
View all IBM 9114-275 manuals
Add to My Manuals
Save this manual to your list of manuals |
IBM 9114-275 manual content summary:
- IBM 9114-275 | Installation Guide - Page 1
IntelliStation POWER 9114 Model 275 Installation Guide SA38-0634-00 - IBM 9114-275 | Installation Guide - Page 2
- IBM 9114-275 | Installation Guide - Page 3
IntelliStation POWER 9114 Model 275 Installation Guide SA38-0634-00 - IBM 9114-275 | Installation Guide - Page 4
(July 2003) Before using this information and the product it supports, read the information in "Safety Notices" on page vii, Appendix To send comments electronically, use this commercial internet address: [email protected]. Any information that you supply may be used without incurring any - IBM 9114-275 | Installation Guide - Page 5
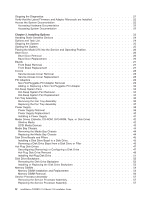
System 1 Step 1. Check Your Inventory 1 IntelliStation POWER 9114 Model 275 1 Step 2. Need Help 3 Step Type 5 Step 9. Attach the Display Cable Toroid 6 Step 10. Connect the Graphics Display 7 Step 11. Connect the Keyboard and Mouse (When Using a Graphics Display 8 Step 12. Connect the Serial - IBM 9114-275 | Installation Guide - Page 6
the Disk Drive Backplane 53 Memory DIMMs 54 Memory DIMM Installation and Replacement 54 Memory DIMM Removal 56 Service Processor Assembly 57 Removing the Service Processor Assembly 57 Replacing the Service Processor Assembly 57 iv IntelliStation POWER 9114 Model 275 Installation Guide - IBM 9114-275 | Installation Guide - Page 7
Replacing the Battery 59 Appendix A. Communications Statements 61 Federal Communications Commission (FCC) Statement 61 European Union (EU) Statement 62 International Electrotechnical Commission (IEC) Statement 62 United Kingdom Telecommunications Safety Requirements 62 Avis de conformité aux - IBM 9114-275 | Installation Guide - Page 8
vi IntelliStation POWER 9114 Model 275 Installation Guide - IBM 9114-275 | Installation Guide - Page 9
, see System Unit Safety Information, order number SA23-2652. Electrical Safety Observe the following safety instructions any time you are connecting or disconnecting devices attached to the workstation. DANGER An electrical outlet that is not correctly wired could place hazardous voltage on metal - IBM 9114-275 | Installation Guide - Page 10
DANGER To prevent electrical shock hazard, disconnect all power cables from the electrical outlet before relocating the system. D01 viii IntelliStation POWER 9114 Model 275 Installation Guide - IBM 9114-275 | Installation Guide - Page 11
each part for laser certification numbers and approval information. CAUTION: All IBM laser modules are designed so that there is never any human access level during normal operation, user maintenance, or prescribed service conditions. Data processing environments can contain equipment transmitting on - IBM 9114-275 | Installation Guide - Page 12
x IntelliStation POWER 9114 Model 275 Installation Guide - IBM 9114-275 | Installation Guide - Page 13
Data Integrity and Verification IBM computer systems contain mechanisms designed to reduce the possibility of undetected data data in sensitive or critical operations. Users should periodically check the IBM support websites for updated information and fixes applicable to the system and related software. - IBM 9114-275 | Installation Guide - Page 14
xii IntelliStation POWER 9114 Model 275 Installation Guide - IBM 9114-275 | Installation Guide - Page 15
and solve minor problems. v The IntelliStation POWER 9114 Model 275 Service Guide, order number SA38-0636, contains reference information, maintenance analysis procedures (MAPs), error codes, removal and replacement procedures, and a parts catalog. v The RS/6000 pSeries Diagnostic Information for - IBM 9114-275 | Installation Guide - Page 16
ergonomic practice is important to get the most from your workstation and to avoid discomfort. This means that the equipment and IBM v pSeries v Eserver Other company, product, and service names may be trademarks or service marks of others. xiv IntelliStation POWER 9114 Model 275 Installation Guide - IBM 9114-275 | Installation Guide - Page 17
, follow the procedures in this chapter. Step 1. Check Your Inventory IntelliStation POWER 9114 Model 275 h Books, CD-ROM and Other Media h ″About Your Machine″ Document h Power Cables (1 standard, 2 optional) h 9-Pin to 25-Pin Serial Converters (2) (optional) h ASCII Terminal (optional) 1 - IBM 9114-275 | Installation Guide - Page 18
Inventory table continued from the previous page. h Display, Cable (optional), and Cable Toroid (optional) h Keyboard (optional), Wrist/Palm Rest (optional) h Mouse (optional) h Power-On Guard hModel 275 2 IntelliStation POWER 9114 Model 275 Installation Guide - IBM 9114-275 | Installation Guide - Page 19
device. v This system has redundant power supply capabilities. Meaning your system has the capability of running two power supplies simultaneously. When instructed to disconnect the power source, ensure that all power cables have been unplugged. DANGER An electrical outlet that is not correctly - IBM 9114-275 | Installation Guide - Page 20
Installed? These instructions are for systems that have internal options (such as adapters, disk drives, or memory information on arranging your workstation, visit the Healthy Computing Web address at: http://www.pc.ibm.com/us/healthycomputing. v IntelliStation POWER 9114 Model 275 Installation Guide - IBM 9114-275 | Installation Guide - Page 21
to their fully extended position. C34 Step 8. Check Your Display or Console Type Notes: 1. If you are using an ASCII terminal with a keyboard as not have a graphics display to connect, refer to "Step 12. Connect the Serial Devices, Parallel Devices, and ASCII Terminal" on page 9. 2. If you are using - IBM 9114-275 | Installation Guide - Page 22
Step 9. Attach the Display Cable Toroid If the cable for your display does not include a toroid, locate the toroid shipped with your system and follow the installation instructions included with the toroid. 1 Display Cable Toroid 6 IntelliStation POWER 9114 Model 275 Installation Guide - IBM 9114-275 | Installation Guide - Page 23
using an ASCII terminal as the console for this system, and do not have a graphics display to connect, continue with "Step 12. Connect the Serial Devices, Parallel Devices, and ASCII Terminal" on page 9. As shown in "Step 9. Attach the Display Cable Toroid" on page 6, connect the graphics display - IBM 9114-275 | Installation Guide - Page 24
included with your keyboard and you want to attach it, refer to the keyboard documentation for installation instructions. As shown in the following illustration, connect the keyboard and mouse to the connectors on the rear of the system unit. 8 IntelliStation POWER 9114 Model 275 Installation Guide - IBM 9114-275 | Installation Guide - Page 25
the Safety Notices" on page 3. 2. To connect a local ASCII terminal, connect the terminal to the rear serial port by using the 9-pin to 25-pin serial converter cable. The 9-pin to 25-pin serial converter is a customer-purchased option. 3. If you have a remote ASCII terminal, connect it through an - IBM 9114-275 | Installation Guide - Page 26
cable to serial port S2 and the UPS cable to serial port S3. Do not run a UPS connected to serial port S2. If you decide to disconnect HACMP, you must reset the service processor using adapters, consult the ″About Your Machine″ document. 10 IntelliStation POWER 9114 Model 275 Installation Guide - IBM 9114-275 | Installation Guide - Page 27
Step 14. Are You Using an Ethernet Connection? If you are unsure whether you are using an Ethernet connection, ask your system administrator. If you are not using Ethernet or you have already connected your Ethernet to an adapter, continue to "Step 15. Connect the Power Cables to the System" on page - IBM 9114-275 | Installation Guide - Page 28
a three-wire power cable and plug for the user's safety. Use this power cable with a properly grounded electrical outlet to avoid electrical shock. C01 12 IntelliStation POWER 9114 Model 275 Installation Guide - IBM 9114-275 | Installation Guide - Page 29
Step 16. Install the Rear Acoustical Cover Install the acoustical cover to the rear of the system. Note: It is important to have the rear acoustical cover installed to suppress excess noise from your system. Step 17. Install the Power-On Button Guard To help prevent accidental power-on or power-off - IBM 9114-275 | Installation Guide - Page 30
see the installation instructions provided with your operating system. Installation of the operating system can be accomplished in one of the following ways: v Installed from a CD (if a CD-ROM drive is installed). On the IntelliStation POWER 9114 Model 275, the CD-ROM drive is a customer-installable - IBM 9114-275 | Installation Guide - Page 31
Your Model 275 To power on the system, do the following: 1. Open the bezel door. 2. Before you press the power button on your operator panel, observe the following: v The power LED is slowly blinking. v An OK prompt is visible in the operator panel display. 1 Operator Panel Display 2 Front Serial - IBM 9114-275 | Installation Guide - Page 32
your service representative. ibm.com/pseries/en_US/infocenter/base. Select AIX documentation. The AIX Documentation CD contains the base set of publications for the operating system, including system-management and end-user documentation. 16 IntelliStation POWER 9114 Model 275 Installation Guide - IBM 9114-275 | Installation Guide - Page 33
system hardware to help you determine if you have a hardware problem. Run the system verification procedure as described in the following steps verification tests. Do not perform any power procedures until the verification procedures instruct you to do so. Operator Panel Power-On Method Perform the - IBM 9114-275 | Installation Guide - Page 34
allows the system to boot in standalone diagnostics from the NIM server if there is a problem booting from the disk drive. For information about setting the bootlist, see the Multiboot section under "SMS" in the client system's service guide. 18 IntelliStation POWER 9114 Model 275 Installation Guide - IBM 9114-275 | Installation Guide - Page 35
command information. In a partitioned system, make the CD-ROM drive available to the partition used to run standalone diagnostics (refer to the IBM Hardware Management Console for pSeries Installation and Operations Guide for more information). Verify with the system administrator and system users - IBM 9114-275 | Installation Guide - Page 36
4. On the Select Device Type screen, select Network. problems might be preventing you from connecting to the NIM server. Verify the settings and the status of the network. If you continue to have problems, contact your service representative. 20 IntelliStation POWER 9114 Model 275 Installation Guide - IBM 9114-275 | Installation Guide - Page 37
results: v The Testing Complete screen displays a message stating No trouble was found. v The A Problem Was Detected On (Time Stamp) menu displays, with either a service request number (SRN) or an error code. Make a note of any codes displayed on the display or operator panel. To perform additional - IBM 9114-275 | Installation Guide - Page 38
at http://publib16.boulder.ibm.com/pseries/en_US/infocenter/base. Select AIX documentation. The AIX Documentation CD contains the base set of publications for the operating system, including system-management and end-user documentation. 22 IntelliStation POWER 9114 Model 275 Installation Guide - IBM 9114-275 | Installation Guide - Page 39
for installing options in the Model 275 system unit. Notes: 1. Installing options in the Model 275 can be performed with the two power supplies running simultaneously in the same system unit. When instructed to disconnect the power source, ensure that all power cables cords before servicing. C21 23 - IBM 9114-275 | Installation Guide - Page 40
Drive)" on page 42 "Media Bay Chassis" on page 44 "Memory DIMMs" on page 54 "Power Supply" on page 38 "Service Processor Assembly" on page 57 "Starting the System" on page 25 "Handling Static-Sensitive Devices" "Stopping the System" on page 25 24 IntelliStation POWER 9114 Model 275 Installation - IBM 9114-275 | Installation Guide - Page 41
and the system goes into standby mode when the operating system is shut the system as root user. Record error codes if they are displayed on the command line, ask the administrator to type shutdown. 4. After you shut down Service Processor Reset Switch (Pinhole) 8 Serial Number Label Chapter 3. - IBM 9114-275 | Installation Guide - Page 42
Placing the Model 275 into the Service and Operating Position The Model 275 can be placed on its side or left in an upright position with the side post. 3. Rotate the bezel door toward the bottom of the system. 4. Close the bezel door. 26 IntelliStation POWER 9114 Model 275 Installation Guide - IBM 9114-275 | Installation Guide - Page 43
Gently pull the bezel up off the base, releasing the lower bezel locking tabs. 5. Put the bezel and bezel door in a safe place. 1 Model 275 2 Bezel-release lever 3 Front Bezel 4 Front Door 5 Lower Bezel Locking Tab (Quantity 2) 6 Lower Bezel Retaining Slots (Quantity 2) Front Bezel Replacement To - IBM 9114-275 | Installation Guide - Page 44
the service access cover against the system drawer, and slide it toward the front of the system. The front edge of the service access cover slides beneath the chassis ledge. 3. Tighten the three thumbscrews located on the rear of the cover. 28 IntelliStation POWER 9114 Model 275 Installation Guide - IBM 9114-275 | Installation Guide - Page 45
be powered off. Hot-pluggable PCI adapters are not supported. Non-Hot-Pluggable PCI Adapter Removal To remove a PCI adapter, do the following: 1. Place the system into the service position as described in "Placing the Model 275 into the Service and Operating Position" on page 26. 2. Shut down the - IBM 9114-275 | Installation Guide - Page 46
8. If you are removing a long adapter, make note of how the back edge of the adapter slides into the molded grooves located on the back wall of the PCI adapter slots. 1 Service Access Cover 2 PCI Adapters 3 System Unit 30 IntelliStation POWER 9114 Model 275 Installation Guide - IBM 9114-275 | Installation Guide - Page 47
cover as described in "Service Access Cover Replacement" on page 28. 15. Connect the adapter cables. 16. Reconnect the power source to the system. 17. Return the system to the operating position as described in "Placing the Model 275 into the Service and Operating Position" on page 26. Chapter - IBM 9114-275 | Installation Guide - Page 48
Place the system into the service position as described in "Placing the Model 275 into the Service and Operating Position" on surface. 10. Set any jumpers or switches as instructed by the adapter's manufacturer documentation. 11. Carefully grasp IntelliStation POWER 9114 Model 275 Installation Guide - IBM 9114-275 | Installation Guide - Page 49
angle. See the following illustration. 3 2 4 5 1 1 Model 275 2 Adapter Retainer Assembly (in the unlocked position) 3 Adapter Retainer Return the system to the operating position as described in "Placing the Model 275 into the Service and Operating Position" on page 26. 17. Connect the adapter - IBM 9114-275 | Installation Guide - Page 50
messages. When a power or cooling error is encountered, AIX adds an entry to the crontab file to ″wall″ a warning message every 12 hours, to alert or remind the customer of the problem. Replacing the faulty part does not clear this crontab 34 IntelliStation POWER 9114 Model 275 Installation Guide - IBM 9114-275 | Installation Guide - Page 51
the IBM pSeries Information Eserver Center at http://publib16.boulder.ibm.com/pseries/ Place the system into the service position as described in "Placing the Model 275 into the Service and Operating Position" on page disk drive backplane, lift the fan assembly straight up and out from - IBM 9114-275 | Installation Guide - Page 52
1 Model 275 2 Guide Rails 3 Latch Tabs 4 LED Light Pipe Plate 5 Latch Buttons 6 Fan Tray Assembly 7 Service Access Cover 36 IntelliStation POWER 9114 Model 275 Installation Guide - IBM 9114-275 | Installation Guide - Page 53
the unlocked position 2. Align the guides on the front of the fan tray with the guide rails in the chassis. 3. service access cover as described in "Service Access Cover Replacement" on page 28. 8. Return the system to the operating position as described in "Placing the Model 275 into the Service - IBM 9114-275 | Installation Guide - Page 54
Shut down the system as described in "Stopping the System" on page 25. 3. Remove the service access cover as described in "Service Access Cover Removal" on page 28. 4. Remove the power cable from the rear of the portion of each handle acts as 38 IntelliStation POWER 9114 Model 275 Installation Guide - IBM 9114-275 | Installation Guide - Page 55
a cam and helps pry the power supply from its connector located on the system backplane. 1 Service Access Cover 2 Power Supply Filler Panel 3 System Unit 4 Power Supply #1 (Primary) 5 Power Supply Release Handle 8. After the power supply is released from its connector, pull - IBM 9114-275 | Installation Guide - Page 56
you are instructed to do so. 5. Replace the service access cover as described in "Service Access Cover Replacement" on page 28. 6. Reconnect the system unit to the power source. 7. Power on the system unit as described in "Starting the System" on page 25. 40 IntelliStation POWER 9114 Model 275 - IBM 9114-275 | Installation Guide - Page 57
back of the new power supply. Note: Do not connect the power cable to the power source until you are instructed to do so. 8. Replace the service access cover as described in "Service Access Cover Replacement" on page 28. 9. Connect the power source to the system unit. 10. Power on the system unit - IBM 9114-275 | Installation Guide - Page 58
Media Drive Replacement To replace a Slimline media drive, do the following: 1. Push the blue plastic retaining tab away from the device slot. 2. While holding the blue plastic retaining tab, grasp the drive and push it into the system. 42 IntelliStation POWER 9114 Model 275 Installation Guide - IBM 9114-275 | Installation Guide - Page 59
1 Service Access Cover 2 Model 275 3 Slimline Diskette (Media Bay 2) 4 Slimline CD-ROM (Media Bay 1) 5 SCSI Media Device (for example: Tape Drive, DVD-RAM Drive) SCSI Media Devices The SCSI media device bay is a full-height bay for SCSI devices only. SCSI Media Device Removal To remove a SCSI - IBM 9114-275 | Installation Guide - Page 60
described in "Bezels" on page 27. 3. Return the system to the operating position as described in "Placing the Model 275 into the Service and Operating Position" on page 26. 4. Start the system as described in "Starting the System" on page 25. 44 IntelliStation POWER 9114 Model 275 Installation Guide - IBM 9114-275 | Installation Guide - Page 61
Bezels and Fillers Each disk drive slot in the Model 275 must contain either a disk drive or the appropriate filler panel. Installing a Disk Drive Bezel to a Disk Drive To install a disk drive bezel to a disk drive, do the following: 1. Remove the disk drive filler panel from the slot you want to - IBM 9114-275 | Installation Guide - Page 62
the disk drive bezel to the front edge of the filler panel or replacement disk drive. 4. Place the filler panel in the empty disk drive slot, or follow the procedures for adding a disk drive as described in "Hot-Plug Disk Drives" on page 47. 46 IntelliStation POWER 9114 Model 275 Installation Guide - IBM 9114-275 | Installation Guide - Page 63
the following procedure, read "Safety Notices" on page vii. Attention: The Linux operating system does not support these hot-pluggable procedures. A system with Linux installed must be shut down and powered off before installing any disk drive or PCI adapter. Note: You do not have to power off - IBM 9114-275 | Installation Guide - Page 64
.com/pseries/en_US/infocenter/base. Select AIX documentation. The AIX Documentation CD contains the base set of publications for the operating system, including system-management and end-user documentation. 14. Press F10 to exit smitty. 48 IntelliStation POWER 9114 Model 275 Installation Guide - IBM 9114-275 | Installation Guide - Page 65
Disk Drive" on page 47. Attention: The Linux operating system does not support these hot-pluggable procedures. A system with Linux installed drive, a lit amber LED located at the front of each disk drive will help you isolate the faulty drive. 5. Log in as root user. 6. At the command line, type - IBM 9114-275 | Installation Guide - Page 66
12. Press F10 to exit smitty. 1 Model 275 2 Disk Drive 3 Disk Drive Release Handle 50 IntelliStation POWER 9114 Model 275 Installation Guide - IBM 9114-275 | Installation Guide - Page 67
when replacing a PCI adapter with the Linux operating system installed. To install a hot-plug disk drive, do the following: 1. Ensure the handle on the front of the disk drive is open (perpendicular to the drive). 2. Align the drive assembly so that it engages the guide rails in the bay. 3. Push the - IBM 9114-275 | Installation Guide - Page 68
disk drive backplane away from the chassis hooks on the wall of the chassis, and lift the disk drive backplane out of the system. 4 3 2 1 1 System Unit in Service Position 2 Disk Drive Filler Panel 52 IntelliStation POWER 9114 Model 275 Installation Guide 3 Disk Drive Backplane 4 Service Access - IBM 9114-275 | Installation Guide - Page 69
with the guides on the disk drive backplane. 6. Tip the disk drive backplane forward onto the chassis hooks. Firmly press the disk drive backplane into the system to the operating position as described in "Placing the Model 275 into the Service and Operating Position" on page 26. 12. Power on the - IBM 9114-275 | Installation Guide - Page 70
service position as described in "Placing the Model 275 into the Service and Operating Position" on page 26. 3. Remove the service access cover as described in "Service 3 (J2B) 54 IntelliStation POWER 9114 Model 275 Installation Guide J0B J1B J0A J1A Location Code U0.1-P1-M1 U0.1-P1-M2 U0.1-P1-M3 - IBM 9114-275 | Installation Guide - Page 71
Memory slot 6 (J0B) Memory slot 7 (J1A) Memory slot 8 (J1B) Location Code U0.1-P1-M4 U0.1-P1-M5 U0.1-P1-M6 U0.1-P1-M7 U0.1-P1-M8 6. . Return the system to the operating position as described in "Placing the Model 275 into the Service and Operating Position" on page 26. 19. Power on the system as - IBM 9114-275 | Installation Guide - Page 72
7. If necessary to access DIMMs on the system backplane, remove the service processor assembly as described in "Service Processor Assembly" on page 57. 8. Before handling any card, board, 1 1 1 Connector Tabs (unlocked position) 2 Memory DIMM 56 IntelliStation POWER 9114 Model 275 Installation Guide - IBM 9114-275 | Installation Guide - Page 73
1. Shut down the system as described in "Stopping the System" on page 25. 2. Place the system into the service position as described in "Placing the Model 275 into the Service and Operating Position" on page 26. 3. Write down the information displayed on the operator panel. 4. Disconnect the power - IBM 9114-275 | Installation Guide - Page 74
Placing the Model 275 into the Service and Operating Position" on page 26. 9. Reconnect cables to the service processor assembly. 10. Reconnect all system power cables. 11. Power on the system as described in "Starting the System" on page 25. 58 IntelliStation POWER 9114 Model 275 Installation Guide - IBM 9114-275 | Installation Guide - Page 75
the bottom of the battery has cleared the top edge of the plastic mount, pull it up and away from the system planar. 1 2 3 1 Service processor assembly 2 Battery 3 Battery plastic mount 7. Replace the battery with part number 00P3903 or equivalent. 8. When installing the new battery, ensure that the - IBM 9114-275 | Installation Guide - Page 76
at http://publib16.boulder.ibm.com/pseries/en_US/infocenter/base. Select AIX documentation. The AIX Documentation CD contains the base set of publications for the operating system, including system-management and end-user documentation. 60 IntelliStation POWER 9114 Model 275 Installation Guide - IBM 9114-275 | Installation Guide - Page 77
, if not installed and used in accordance with the instructions, may cause harmful interference to radio communications. However, there to which the receiver is connected. v Consult an authorized dealer or service representative for help. Properly shielded and grounded cables and connectors must be - IBM 9114-275 | Installation Guide - Page 78
classe B est conform à la norme NMB-003 du Canada. Canadian Department of Communications Compliance Statement This Class B digital apparatus complies with Canadian ICES-003. 62 IntelliStation POWER 9114 Model 275 Installation Guide - IBM 9114-275 | Installation Guide - Page 79
or TV receiver, it may becaome the cause of radio interference. Read the instructions for correct handling. Radio Protection for Germany Dieses Gerät ist berechtigt in Der Aussteller der Konformitätserklärung ist die IBM Germany. Dieses Gerät erfüllt die Bedingungen der EN 55022 Klasse - IBM 9114-275 | Installation Guide - Page 80
64 IntelliStation POWER 9114 Model 275 Installation Guide - IBM 9114-275 | Installation Guide - Page 81
For country specific instructions refer to the following web site: http://www.ibm.com/ibm/environment/products/prp.phtml This product may contain a sealed lead acid, nickel cadmium, nickel metal hydride, lithium, or lithium ion battery. Consult your user manual or service manual for specific battery - IBM 9114-275 | Installation Guide - Page 82
66 IntelliStation POWER 9114 Model 275 Installation Guide - IBM 9114-275 | Installation Guide - Page 83
the operation of any product, program, or service. The manufacturer may have patents or pending where such provisions are inconsistent with local law: THIS MANUAL IS PROVIDED ″AS IS″ WITHOUT WARRANTY OF ANY include technical inaccuracies or typographical errors. Changes are periodically made to - IBM 9114-275 | Installation Guide - Page 84
68 IntelliStation POWER 9114 Model 275 Installation Guide - IBM 9114-275 | Installation Guide - Page 85
of the system's identification information. Identification Numbers Record and retain the following information: Product Name IntelliStation POWER 9114 Model 275 Serial Number Key Serial Number The system unit's serial numbers are located on the front of the machine, as shown in the following - IBM 9114-275 | Installation Guide - Page 86
to your system. This information can be helpful when you install additional options in your system or if your system needs service. Memory Card 1 Memory DIMM 1 J3B (U0.1-P1-M1) 2 Memory DIMM 2 J3A (U0.1-P1-M2) 3 512 MB, 1024 MB, or 2048 MB. 70 IntelliStation POWER 9114 Model 275 Installation Guide - IBM 9114-275 | Installation Guide - Page 87
Connector Expansion Slot 6 Expansion Slot 5 Expansion Slot 4 Expansion Slot 3 Expansion Slot 2 Expansion Slot 1 Parallel Port Serial Port 1 Serial Port 2 Serial Port 3 Ethernet 1 Ethernet 2 Option Description IBM Mouse h Other Space Saving h Enhanced h Other Appendix D. System Records 71 - IBM 9114-275 | Installation Guide - Page 88
and four disk drives. 3. Media bay location Index 2 is designed to house one of the following optional devices: v IDE Optical Drive v Diskette Drive Any SCSI device used in media bay location Index 4 must be connected to a PCI SCSI adapter. 72 IntelliStation POWER 9114 Model 275 Installation Guide - IBM 9114-275 | Installation Guide - Page 89
programs are loaded. General Setup Attributes Machine mode 3151 /11/31/41 Settings 3151 Generated Code Set Screen Row and Column Scroll Auto LF , use these attribute settings. Otherwise, refer to your operator's manual, compare the attribute descriptions with those of your terminal, and set - IBM 9114-275 | Installation Guide - Page 90
to the system unit for translation and then sent back to the display screen. Sometimes called conversational mode. Uses the 9600 bps (bits per second) line speed to communicate with the system unit. Selects when the Return key is pressed. 74 IntelliStation POWER 9114 Model 275 Installation Guide - IBM 9114-275 | Installation Guide - Page 91
Keyboard Setup Attributes New line Send Insert character 3151/11 /31/41 Settings CR Page Space 3151 /51/61 Settings CR 3161 /3164 Settings CR Page Space Page Space Description The Return key generates the carriage return (CR) and the line feed (LF) characters. The line turnaround occurs after - IBM 9114-275 | Installation Guide - Page 92
76 IntelliStation POWER 9114 Model 275 Installation Guide - IBM 9114-275 | Installation Guide - Page 93
at http://www.rs6000.ibm.com/support/micro. Always check the Web site for the latest images and instructions for checking the firmware service processor main menu. If the system is running Linux, the platform firmware level can be determined by the following methods: v On the Linux command line type - IBM 9114-275 | Installation Guide - Page 94
the shutdown command. While the update is in progress, you will see Rebooting... on the display for several minutes. The firmware update is complete. 78 IntelliStation POWER 9114 Model 275 Installation Guide - IBM 9114-275 | Installation Guide - Page 95
275) 27 removal 27 C checklist, inventory 1 configuration client 19 NIM server 19 connect internal ethernet 11 connecting adapter cables 10 graphics display 7 keyboard and mouse 8 serial and parallel devices 9 console, display type 5 covers 28 removal 28 replacement 28 D deconfiguring disk drives - IBM 9114-275 | Installation Guide - Page 96
removal 28 adapters 29 bezel (Model 275) 27 caution and danger 23 front door 26 service access cover 28 static-sensitive devices 24 removal and replacement procedures 23 access cover removal 28 80 IntelliStation POWER 9114 Model 275 Installation Guide removal and replacement procedures (continued - IBM 9114-275 | Installation Guide - Page 97
system records 69 key serial number 69 machine type/model 69 serial number 69 system, set up 1 system, starting 15, 25 T toroid, display 6 trademarks xiv TTY terminal attributes general 73 TTY terminal attributes required for diagnostics 73 V - IBM 9114-275 | Installation Guide - Page 98
82 IntelliStation POWER 9114 Model 275 Installation Guide - IBM 9114-275 | Installation Guide - Page 99
We'd Like to Hear from You IntelliStation POWER 9114 Model 275 Installation Guide Publication No. SA38-0634-00 Overall, responses. May we contact you? h Yes h No When you send comments to IBM, you grant IBM a nonexclusive right to use or distribute your comments in any way it believes appropriate - IBM 9114-275 | Installation Guide - Page 100
Readers' Comments - We'd Like to Hear from You SA38-0634-00 Cut or Fold Along Line F_o_ld_a_n_d_T_ap_e P_le_a_s_e_d_o_n_o_t s_t_ap_l_e Fo_l_d _an_d_T_a_pe_ _ _ _ NO POSTAGE NECESSARY IF MAILED IN THE UNITED STATES BUSINESS REPLY MAIL FIRST-CLASS MAIL PERMIT NO. 40 ARMONK, NEW YORK POSTAGE - IBM 9114-275 | Installation Guide - Page 101
- IBM 9114-275 | Installation Guide - Page 102
Part Number: 00P5944 Printed in U.S.A. SA38-0634-00 (1P) P/N: 00P5944
-
 1
1 -
 2
2 -
 3
3 -
 4
4 -
 5
5 -
 6
6 -
 7
7 -
8
-
9
-
10
-
11
-
12
-
13
-
14
-
15
-
16
-
17
-
18
-
19
-
20
-
21
-
22
-
23
-
24
-
25
-
26
-
27
-
28
-
29
-
30
-
31
-
32
-
33
-
34
-
35
-
36
-
37
-
38
-
39
-
40
-
41
-
42
-
43
-
44
-
45
-
46
-
47
-
48
-
49
-
50
-
51
-
52
-
53
-
54
-
55
-
56
-
57
-
58
-
59
-
60
-
61
-
62
-
63
-
64
-
65
-
66
-
67
-
68
-
69
-
70
-
71
-
72
-
73
-
74
-
75
-
76
-
77
-
78
-
79
-
80
-
81
-
82
-
83
-
84
-
85
-
86
-
87
-
88
-
89
-
90
-
91
-
92
-
93
-
94
-
95
-
96
-
97
-
98
-
99
-
100
-
101
-
102
 |
 |

IntelliStation POWER 9114 Model 275
Installation Guide
SA38-0634-00
±²³