IBM 9114-275 Installation Guide - Page 31
Step 20. Start Your Model 275
 |
View all IBM 9114-275 manuals
Add to My Manuals
Save this manual to your list of manuals |
Page 31 highlights
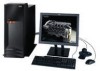
Step 20. Start Your Model 275 To power on the system, do the following: 1. Open the bezel door. 2. Before you press the power button on your operator panel, observe the following: v The power LED is slowly blinking. v An OK prompt is visible in the operator panel display. 1 Operator Panel Display 2 Front Serial Connector (FS1) 3 Attention LED 4 System Reset Button 5 Power LED 6 Power-On Button 7 Power-On Guard 8 Service Processor Reset Switch (Pinhole) 9 Serial Number Label 3. Press the power-on button on the operator panel. After you press the power-on button located on the operator panel, observe the following: a. The power LED begins to blink visibly faster. b. The system cooling fans are activated after a short interval and can be heard accelerating to operating speed. Note: There is approximately a 30-second transition period between the time the power-on button is pressed and the power LED remains on solid (no longer blinking). c. The power LED stays on solid. Progress indicators, also referred to as checkpoints, are visible on the operator panel display. Chapter 1. Setting Up the System 15
-
 1
1 -
2
-
3
-
4
-
5
-
6
-
7
-
8
-
9
-
10
-
11
-
12
-
13
-
14
-
15
-
16
-
17
-
18
-
19
-
20
-
21
-
22
-
23
-
24
-
25
-
 26
26 -
 27
27 -
 28
28 -
 29
29 -
 30
30 -
 31
31 -
 32
32 -
 33
33 -
 34
34 -
 35
35 -
 36
36 -
37
-
38
-
39
-
40
-
41
-
42
-
43
-
44
-
45
-
46
-
47
-
48
-
49
-
50
-
51
-
52
-
53
-
54
-
55
-
56
-
57
-
58
-
59
-
60
-
61
-
62
-
63
-
64
-
65
-
66
-
67
-
68
-
69
-
70
-
71
-
72
-
73
-
74
-
75
-
76
-
77
-
78
-
79
-
80
-
81
-
82
-
83
-
84
-
85
-
86
-
87
-
88
-
89
-
90
-
91
-
92
-
93
-
94
-
95
-
96
-
97
-
98
-
99
-
100
-
101
-
102
 |
 |
