IBM 9114-275 Installation Guide - Page 21
Step 7. Adjust the Stability Feet, Step 8. Check Your Display or Console Type
 |
View all IBM 9114-275 manuals
Add to My Manuals
Save this manual to your list of manuals |
Page 21 highlights
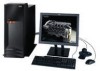
Step 7. Adjust the Stability Feet To retract the stability feet, push the tabs down and slide the plates inward. To extend the feet, slide the plates outward until the retraction tabs are fully visible and snap securely into place. 1 Stability Feet Retraction Tabs (bottom view) CAUTION: The system is equipped with stability feet to help ensure that the system unit cannot easily be tipped over. The stability feet might be either standard non-adjustable feet or an adjustable base stability foot. Ensure that the stability feet are installed and adjusted to their fully extended position. C34 Step 8. Check Your Display or Console Type Notes: 1. If you are using an ASCII terminal with a keyboard as the console for this system, and do not have a graphics display to connect, refer to "Step 12. Connect the Serial Devices, Parallel Devices, and ASCII Terminal" on page 9. 2. If you are using a graphics display with a keyboard and mouse, continue with "Step 9. Attach the Display Cable Toroid" on page 6. If you ordered a graphics display with your system unit, the graphics adapter has been set to use the highest display resolution and refresh rate available for that display. If you want to: v Attach another display to your system unit OR v Change the default display resolution or refresh rate after completing the installation steps, refer to the Customer Installable Options Library CD-ROM for the documentation for your graphics adapter. As shown in "Step 9. Attach the Display Cable Toroid" on page 6, connect the graphics display cable to the back of the display and to the graphics adapter connector. Consult the ″About Your Machine″ document for the locations of installed adapters. For more information about your display, refer to the documentation included with the display. Chapter 1. Setting Up the System 5
-
 1
1 -
2
-
3
-
4
-
5
-
6
-
7
-
8
-
9
-
10
-
11
-
12
-
13
-
14
-
15
-
 16
16 -
 17
17 -
 18
18 -
 19
19 -
 20
20 -
 21
21 -
 22
22 -
 23
23 -
 24
24 -
 25
25 -
 26
26 -
27
-
28
-
29
-
30
-
31
-
32
-
33
-
34
-
35
-
36
-
37
-
38
-
39
-
40
-
41
-
42
-
43
-
44
-
45
-
46
-
47
-
48
-
49
-
50
-
51
-
52
-
53
-
54
-
55
-
56
-
57
-
58
-
59
-
60
-
61
-
62
-
63
-
64
-
65
-
66
-
67
-
68
-
69
-
70
-
71
-
72
-
73
-
74
-
75
-
76
-
77
-
78
-
79
-
80
-
81
-
82
-
83
-
84
-
85
-
86
-
87
-
88
-
89
-
90
-
91
-
92
-
93
-
94
-
95
-
96
-
97
-
98
-
99
-
100
-
101
-
102
 |
 |
