IBM HC10 User Guide - Page 35
Closing, blade, workstation, cover
 |
UPC - 883436017671
View all IBM HC10 manuals
Add to My Manuals
Save this manual to your list of manuals |
Page 35 highlights
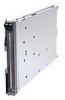
Closing the blade workstation cover Important: The blade workstation cannot be inserted into the BladeCenter unit until the cover is installed and closed. Do not attempt to override this protection. The following illustration shows how to close the blade workstation cover. Cover pins Blade-cover release Blade-cover release To close the blade workstation cover, complete the following steps: 1. Read the safety information that begins on page v and "Installation guidelines" on page 15. 2. If you removed the blade bezel assembly, replace it now (see "Installing the blade workstation bezel assembly" on page 22 for instructions). 3. Make sure that all components are installed and seated correctly and that you have not left loose tools or parts inside the blade workstation. 4. Make sure that the control-panel cable and all other cables are placed so that the cover does not crimp or pinch them. 5. Lower the cover so that the slots at the rear slide down onto the pins at the rear of the blade workstation, as shown in the illustration. 6. Pivot the cover to the closed position, as shown in the illustration, until it clicks into place. Chapter 3. Installing optional devices 23
-
 1
1 -
2
-
3
-
4
-
5
-
6
-
7
-
8
-
9
-
10
-
11
-
12
-
13
-
14
-
15
-
16
-
17
-
18
-
19
-
20
-
21
-
22
-
23
-
24
-
25
-
26
-
27
-
28
-
29
-
 30
30 -
 31
31 -
 32
32 -
 33
33 -
 34
34 -
 35
35 -
 36
36 -
 37
37 -
 38
38 -
 39
39 -
 40
40 -
41
-
42
-
43
-
44
-
45
-
46
-
47
-
48
-
49
-
50
-
51
-
52
-
53
-
54
-
55
-
56
-
57
-
58
-
59
-
60
-
61
-
62
-
63
-
64
-
65
-
66
-
67
-
68
-
69
-
70
-
71
-
72
-
73
-
74
 |
 |
