Image Fitness 5.2 English Manual - Page 12
positioned
 |
View all Image Fitness 5.2 manuals
Add to My Manuals
Save this manual to your list of manuals |
Page 12 highlights
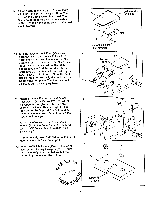
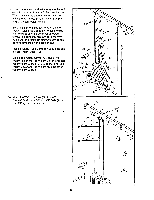
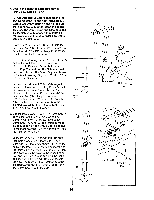
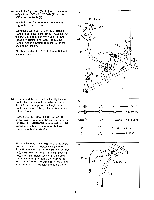
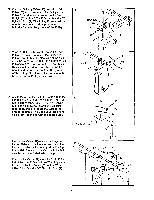
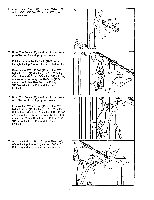
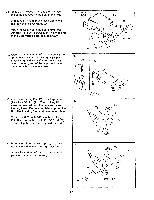
22. Wrap the Butterfly Cable (96) around a 3 1/2" 22 Pulley (30) as shown. Attach the Pulley and a Pulley Cover (23) to the bracket on the Front Upright (65) with a 3/8" x 2" Bolt (19) and a 3/8" Nylon Locknut (1). The Pulley Cover must be oriented as shown and be positioned to hold the Cable in the groove of the Pulley. . 1 Bracket 0( 30 • 23 . 1977 96 65 . 23. Wrap the Butterfly Cable (96) around a 3 1/2" Pulley (30) as shown. Attach the Pulley and a Pulley Cover (23) to the other side of the bracket on the Front Upright (65) with a 3/8" x 2" Bolt (19) and a 3/8" Nylon Locknut (1). The Pulley Cover must be oriented as shown and be positioned to hold the Cable in the groove of the Pulley. The slack in the Cable should be between the Pulleys as shown. 23 • Bracket . 1 . 0 23 19 96 ,4'.. - 30 65 24. Attach the end of the Butterfly Cable (96) to the Left Butterfly Arm (59) with a 3/8" x 1 1/4" Bolt 24 inn\ - fC Vit. , V V CLOI 1G1 .-. 4 Pnr1 n Cl 1/4- A 1-.11-101111 19 (38), and a 3/8" Nylon Locknut (1). Be sure that the Bushing is inside the loop at the end of the Cable. The Cable must be orient- ed so that it is in line with the cable guide. 96 22 $._____L...Qwl: ,5 1-' ,,..' 38 Cable Guide 59 25. Find the Lat Cable (97)-this is the longer of the two Cables with a threaded end. Feed the Lat Cable under the indicated post on the Top Frame (76). The end of the Cable with the ball must be on the indicated side of the post. Wrap the Lat Cable (97) around a 3 1/2" Pulley (30). Attach the Pulley and two Wheel Spacers (51) inside the Top Frame (76) with a 3/8" x 2 3/4" Bolt (17) and a 3/8" Nylon Locknut (1). 25 • 76 • 97 51 . ° 30 1 - Post 17 Ball 6.: 17 12
-
 1
1 -
2
-
3
-
4
-
5
-
6
-
 7
7 -
 8
8 -
 9
9 -
 10
10 -
 11
11 -
 12
12 -
 13
13 -
 14
14 -
 15
15 -
 16
16 -
 17
17 -
18
-
19
-
20
-
21
-
22
-
23
-
24
-
25
-
26
-
27
-
28
-
29
-
30
-
31
-
32
-
33
-
34
-
35
-
36
-
37
-
38
-
39
 |
 |
