Image Fitness 5.2 English Manual - Page 9
thoroughly
 |
View all Image Fitness 5.2 manuals
Add to My Manuals
Save this manual to your list of manuals |
Page 9 highlights
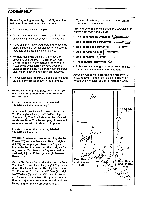
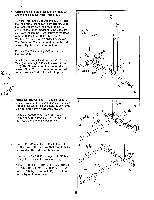
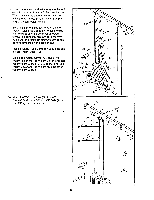
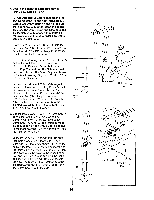
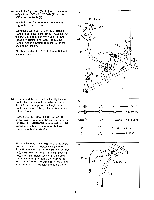
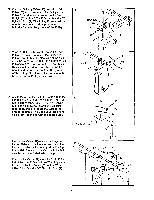
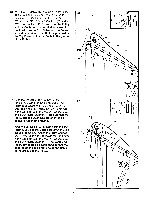
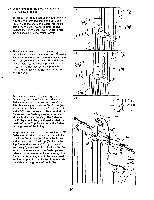
15. Press a 1 3/4" Square Inner Cap (58) into each 15 end of the Left Butterfly Arm (59) and into each end of the Right Butterfly Arm (60). IMPORTANT NOTE: Before assembling the 3/4" Dome Caps (6) and 3/4" Retainers (3), used in this assembly step, be sure that you thoroughly understand the assembly step. The Dome Caps and Retainers can be assembled only once. If they must be removed, you will need to order new Dome Caps and/or Retainers. Slide a Weld Cover (53) onto the axle of the Left Butterfly Arm (59). Be sure that the Weld Cover is turned so the open side is facing the weld on the Left Butterfly Arm. Lubricate the axle. Slide the axle into the indicated hole in the Top Frame (76). Slide a 1 1/2" x 3/4" Washer (4) onto the axle. Press two 3/4" Retainers (3) onto the axle, one at a time. The teeth on the Retainers must be pointed away from the Washer, as shown in the inset drawing. Tap a 3/4" Dome Cap (6) onto the axle. Attach the Right Butterfly Arm (60) in the same manner. a 53 Lubricate Axle 60 4 76 53 Lubricate Axle 58 9 3 58 -4 16. Attach a Butterfly Arm Pad (61) to the Left 16 ettarFlw D rIM /cal with hAin i /A" v 0 1 /A" CrralAic, (25) and two 1/4" Washers (26). Attach a Butterfly Arm Pad (61) to the Right Butterfly Arm (60) in the same manner. 59 60 61 61 Aro 25 • 26 25 • 9 OEC 16 1996 -1•/7/
-
 1
1 -
2
-
3
-
 4
4 -
 5
5 -
 6
6 -
 7
7 -
 8
8 -
 9
9 -
 10
10 -
 11
11 -
 12
12 -
 13
13 -
 14
14 -
15
-
16
-
17
-
18
-
19
-
20
-
21
-
22
-
23
-
24
-
25
-
26
-
27
-
28
-
29
-
30
-
31
-
32
-
33
-
34
-
35
-
36
-
37
-
38
-
39
 |
 |
