Image Fitness 5.2 English Manual - Page 22
Note:
 |
View all Image Fitness 5.2 manuals
Add to My Manuals
Save this manual to your list of manuals |
Page 22 highlights
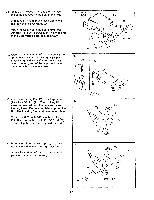
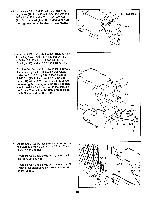
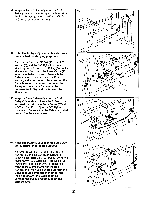
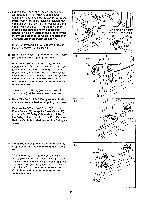
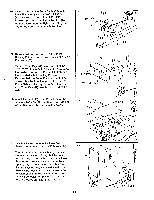
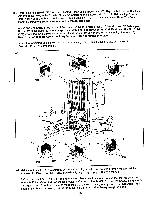
53. Wrap the Press Cable (95) around a 3 1/2" 53 Pulley (30). Attach the Pulley to the bracket on the Rear Upright (77) with a 3/8" x 1 3/4" Bolt (10) and a 3/8" Nylon Locknut (1). • 1 77 54. Note: The Pulley (30) used in this step was pre-attached for shipping purposes. Remove the 3/8" x 3 1/2" Bolt (15), the 3/8" Washer (5), and the 3/8" Nylon Locknut (1) attaching the indicated 3 1/2" Pulley (30) to the Moment Arm (86). Wrap the Press Cable (95) around the Pulley as shown. Re-attach the Pulley to the Moment Arm with the Bolt, Washer, and Nylon Locknut. Be sure that the Cable is routed under and then over the Pulley as shown; the Cable must be between the Pulley and the tube on the Moment Arm. 55. Wrap the Press Cable (95) around a 3 1/2" Pulley (30) as shown. Attach the Pulley to the indicated bracket on the Press Frame (87) with a 3/8" x 1 3/4" Bolt (10) and a 3/8" Nylon Locknut (1). Be sure that the Cable is routed around the Pulley as shown. /21 54 0 1 95 30 Tube 30 95 10 86 5 15 55 0 -9 II 10 • 87 30 co 95 56. Note: The Pulley (30) used in this step was pre-attached for shipping purposes. 56 Remove the 3/8" x 3 1/2" Bolt (15), the 3/8" Washer (5), and the 3/8" Nylon Locknut (1) attaching the indicated 3 1/2" Pulley (30) to the Moment Arm (86). Wrap the Press Cable (95) around the Pulley as shown. Re-attach the Pulley to the Moment Arm with the Bolt, Washer, and Nylon Locknut. Be sure that the Cable is routed over and then under the Pulley as shown; the Cable must be between the Pulley and the tube on the Moment Arm. 15 5 / 0 30 Tube 86 22
-
 1
1 -
2
-
3
-
4
-
5
-
6
-
7
-
8
-
9
-
10
-
11
-
12
-
13
-
14
-
15
-
16
-
 17
17 -
 18
18 -
 19
19 -
 20
20 -
 21
21 -
 22
22 -
 23
23 -
 24
24 -
 25
25 -
 26
26 -
 27
27 -
28
-
29
-
30
-
31
-
32
-
33
-
34
-
35
-
36
-
37
-
38
-
39
 |
 |
