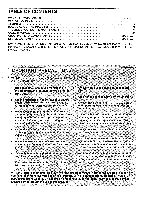
Image Fitness 5.2 English Manual - Page 7
Large
 |
View all Image Fitness 5.2 manuals
Add to My Manuals
Save this manual to your list of manuals |
Page 7 highlights
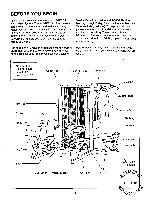
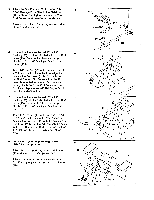
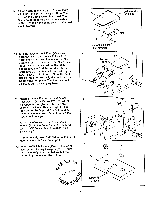
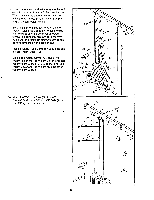
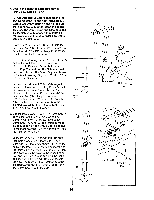
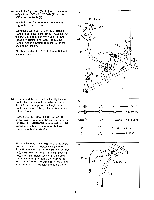
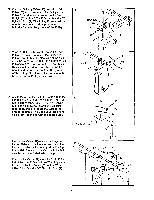
9. Attach a Seat (63) to the Seat Bracket (108) with four 1/4" x 3/4" Screws (24). Note: The post on the Seat Bracket is slanted. The Seat should be turned so that the wide end of the Seat is on the same side that the post slants toward. 10. Turn the indicated Lock Knob (45) counterclockwise until it turns freely. Pull the Lock Knob and hold it. Insert the tube on the Seat Bracket (108) into the tube on the Curl Frame (109). The narrow end of the Seat (63) should face the Curl Frame. Move the Seat Bracket so that the Seat is in the desired position. Release the Lock Knob. Move the Seat Bracket up and down slightly until the Lock Knob locks into place. Turn the Lock Knob clockwise until it is firmly tightened. 9 63 Wide end on this side .-: 108 ' 24 24 74 i :. >". Post should slant this direction 10 63 Narrow End 108 ' .---- .- . .--- 45 109 11. Attach the Press Frame Handle (82) to the Rear Hpright (77) with two TR" X 5" Bolts (14). a Support Bracket (78), and two 3/8" Nylon Locknuts (1). Note: This is a tight fit. The long end of the Support Bracket must be facing down as shown. Do not tighten the Nylon Locknuts yet. Attach the other end of the Press Frame Handle (82) to the Press Frame (87) with two 3/8" x 1 3/4" Bolts (10) and two 3/8" Nylon Locknuts (1). Tighten the eighteen 3/8" Nylon Locknuts (1) used in steps 1-4 and in step 11. 12. Press two Weight Inserts (104) into the top of each of the thirty-eight Weights (75). Be sure that each Weight is oriented so that the large pin groove is on the bottom. )1(
-
 1
1 -
 2
2 -
 3
3 -
 4
4 -
 5
5 -
 6
6 -
 7
7 -
 8
8 -
 9
9 -
 10
10 -
 11
11 -
 12
12 -
13
-
14
-
15
-
16
-
17
-
18
-
19
-
20
-
21
-
22
-
23
-
24
-
25
-
26
-
27
-
28
-
29
-
30
-
31
-
32
-
33
-
34
-
35
-
36
-
37
-
38
-
39
 |
 |
