Image Fitness 5.2 English Manual - Page 24
tightened.
 |
View all Image Fitness 5.2 manuals
Add to My Manuals
Save this manual to your list of manuals |
Page 24 highlights
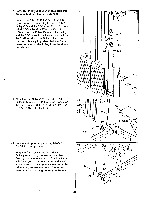
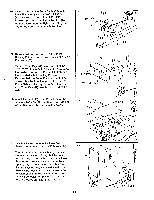
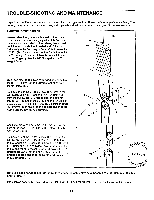
61. Attach the end of the Press Cable (95) to the Press Frame (87) with the 3/8" x 3 1/4" Bolt (27), two 3/8" Washers (5), a 5/8" x 1/2" Bushing (36), and a 3/8" Nylon Jam Nut (20). Do not overtighten the Nylon Jam Nut; the end of the Cable must be able to pivot. 61 27---8 , 5 5 0. ,36 '144 87 - - 20 95 62. Be sure that the pre-attached 1/2" x 2 1/4" Bushing (33) is in the indicated hole in the Leg Press Arm (88). Tap a 1/2" Hat Cap (47) onto one end of the 1/2" x 7 3/8" Axle (49). Lubricate the Axle. Align the welded tubes on the Press Plate (89) with the indicated hole in the Leg Press Arm (88). Be sure that the Press Plate is oriented as shown. Tap the Axle through the holes in the Press Plate and the Leg Press Arm. Tap another 1/2" Hat Cap (47) onto the other end of the Axle. 63. Attach the Seat (63) to the Press Frame (87) with fntir 1/4" Y n/4" Snows (24). The wide end of the Seat must be on the side shown. 62 47 49 Lubricate 89 Hole 88 47 33 Welded Tubes 63 i ,---- ,--, Wide End 6r1.- -K ' NJ 64. Attach a Backrest (62) to the Press Seat Bracket (79) with two 1/4" x 3/4" Screws (24). Turn the indicated Lock Knob (45) counterclockwise until it turns freely. Pull the Lock Knob and hold it. Insert the tube on the Press Seat Bracket (79) into the tube on the Rear Upright (77). Move the Press Seat Bracket so that the Backrest (62) is in the desired position. Release the Lock Knob. Move the Press Seat Bracket back and forth slightly until the Lock Knob locks into place. Turn the Lock Knob clockwise until it is firmly tightened. 87 64 62 24 o 24 0 o 79 ."2"--24 77 2 45 24
-
 1
1 -
2
-
3
-
4
-
5
-
6
-
7
-
8
-
9
-
10
-
11
-
12
-
13
-
14
-
15
-
16
-
17
-
18
-
 19
19 -
 20
20 -
 21
21 -
 22
22 -
 23
23 -
 24
24 -
 25
25 -
 26
26 -
 27
27 -
 28
28 -
 29
29 -
30
-
31
-
32
-
33
-
34
-
35
-
36
-
37
-
38
-
39
 |
 |
