Image Fitness 5.2 English Manual - Page 21
Image Fitness 5.2 Manual
 |
View all Image Fitness 5.2 manuals
Add to My Manuals
Save this manual to your list of manuals |
Page 21 highlights
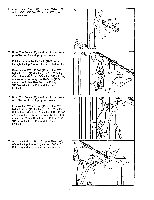
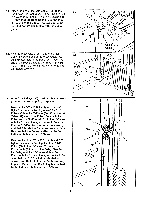
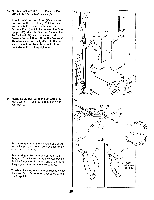
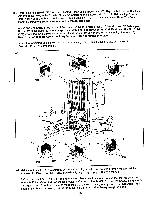
50. Attach the end of the Curl Cable (106) to the Curl Lever (114) with a 3/8" x 1 1/4" Bolt (22), a 3/8" Washer (5), and a 1/2" x 3/8" Bushing (38). Be sure that the Bushing Is Inside the loop at the end of the Cable. The Cable must be oriented so that It Is In line with the cable guide. 51. Find the Press Cable (95)-this is the last Cable. Insert the end of the Press Cable into the indicated hole in the Base (94). Attach the end of the Press Cable to the Base with a 3/8" x 2 3/4" Bolt (17), two 3/8" Washers (5), and a 3/8" Nylon Locknut (1). 50 38-0 22 5 114 106 Cable Guide 51 95 94 5 17 52. Note: The Pulleys (30) used in this step were pre-attached for shipping purposes. 52 Remove the 3/8" x 2" Bolt (19) and the 3/8" Nylon Locknut (1) attaching one of the 3 1/2" Pulleys (30) to the "I"-Plates (80). Wrap the Lat Cable (97) around the Pulley. Re-attach the Pulley and the "L"-Bracket (81) to the "I"-Plates with the Bolt and the Nylon Locknut. Be sure that the "L"-Bracket is oriented as shown, and that it holds the Cable securely in place. Be sure that the Pulley is attached to the indicated holes in the "I"-Plates. 97 I 81 30 80 O O a N 0 O Remove the other 3/8" x 2" Bolt (19) and 3/8" 19 O O 80 Nylon Locknut (1) attaching the other 3 1/2" Pulley (30) to the "I"-Plates (80). Wrap the Press Cable (95) around the Pulley. Re-attach the Pulley and the "L"-Bracket (81) to the "I"- Plates with the Bolt and the Nylon Locknut. Be sure that the "L"-Bracket is oriented as shown, and that it holds the Cable securely 95 in place. Be sure that the Pulley is attached to the indicated holes in the "I"-Plates. O 21
-
 1
1 -
2
-
3
-
4
-
5
-
6
-
7
-
8
-
9
-
10
-
11
-
12
-
13
-
14
-
15
-
 16
16 -
 17
17 -
 18
18 -
 19
19 -
 20
20 -
 21
21 -
 22
22 -
 23
23 -
 24
24 -
 25
25 -
 26
26 -
27
-
28
-
29
-
30
-
31
-
32
-
33
-
34
-
35
-
36
-
37
-
38
-
39
 |
 |
