Image Fitness 5.2 English Manual - Page 26
Incorrectly
 |
View all Image Fitness 5.2 manuals
Add to My Manuals
Save this manual to your list of manuals |
Page 26 highlights
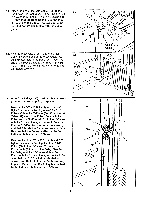
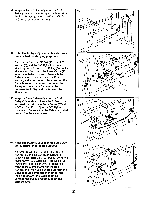
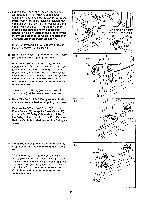
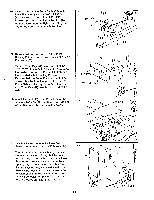
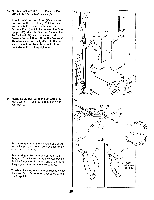
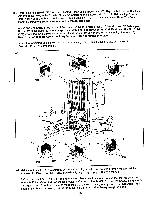
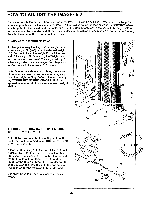
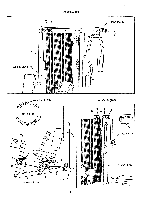
68. Center bath Mid Shields (122) on the indicated Upper Shield Brackets (120). Align the holes in the Brackets with two of the holes in the Shields. Attach the Shields to the Brackets with four 1/2" Self-tapping Screws (118). Attach both Mid Shields to the Lower Shield Brackets (119) in the same manner. Note: The Selftapping Screws will require some effort to thread into place. Attach one End Shield (121) to one of the remaining Upper Shield Brackets (120) with two 1/2" Self-tapping Screws (118). Be sure that there is approximately a 3" gap between the End Shield and the Mid Shield (122). Attach that End Shield to the Lower Shield Bracket (119) with two 1/2" Self-tapping Screws (118). Note: The Self-tapping Screws will require some effort to thread Into place. Attach the remaining End Shield (121) to the remaining Upper Shield Bracket (120) and Lower Shield Bracket (119) in the same manner. 68 118 120 118 118 118 122 121 120 120 121 Qa 121 121 118 122 118 119 119 118 118 119 118 119 69. Make sure that all parts are correctly assembled and tightened. The use of the remaining parts will be explained in HOW TO ADJUST THE IMAGES 5.2, beginning on page 26 of this manual. Before using the IMAGE 5.2, pull the end of each cable a few times to make sure that the cables move smoothly. If the cables bind, correct the problem before using the IMAGE 5.2. See the CABLE DIAGRAMS on pages 30 and 31 of this manual to make sure that the cables are properly routed. IMPORTANT: If the cables have been Incorrectly routed, they will be damaged when heavy weight is used. 2R
-
 1
1 -
2
-
3
-
4
-
5
-
6
-
7
-
8
-
9
-
10
-
11
-
12
-
13
-
14
-
15
-
16
-
17
-
18
-
19
-
20
-
 21
21 -
 22
22 -
 23
23 -
 24
24 -
 25
25 -
 26
26 -
 27
27 -
 28
28 -
 29
29 -
 30
30 -
 31
31 -
32
-
33
-
34
-
35
-
36
-
37
-
38
-
39
 |
 |
