Intel PRO/100 Setup Guide - Page 7
Continue with Software Installation, - hp
 |
UPC - 735858110105
View all Intel PRO/100 manuals
Add to My Manuals
Save this manual to your list of manuals |
Page 7 highlights
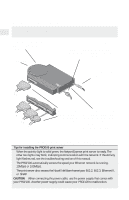
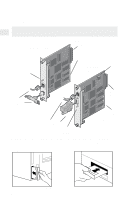
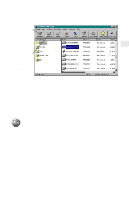
To install the internal PRO print server card in your printer 1 Power down the printer and disconnect the printer power cable. 2 If necessary, remove the cover plate from the printer MIO (Modular Input/Output) slot. 3 Record the NetportExpress print server device ID so you can refer to it later. 4 Check the back of the MIO slot to see where the connector is. 5 Insert the print server card, making sure you align the connector on the card with the connector at the back of the MIO slot. When correctly seated, the face plate on the card should rest flat against the printer frame. 6 Secure the print server card by tightening the screws. Alternate tightening them to keep the card stable in the slot. 7 Attach the network cable for your type of network. 8 Plug in the printer power cable and power on the printer. 9 Press the diagnostics button on the NetportExpress print server card to print a test page. The test page includes the Device ID and other configuration information. Continue with Software Installation, page 6. . . Tips for installing the internal print server • The PRO internal print server card connects to MIO printer slots. • To get a complete list of all supported printers, see Intel's automated customer support services information at the back of this manual. • The HP LaserJet* 4Si and 5Si printers have two MIO slots. Install the NetportExpress PRO print server card into the lower slot. For instructions, install the Netport Manager software on any networked Windows workstation and refer to online Help, or see Intel's online support documents. • The token ring card autosenses data rate speeds when both switches are in the default UP position. (See page 34 for list of settings.) 5
-
 1
1 -
 2
2 -
 3
3 -
 4
4 -
 5
5 -
 6
6 -
 7
7 -
 8
8 -
 9
9 -
 10
10 -
 11
11 -
 12
12 -
13
-
14
-
15
-
16
-
17
-
18
-
19
-
20
-
21
-
22
-
23
-
24
-
25
-
26
-
27
-
28
-
29
-
30
-
31
-
32
-
33
-
34
-
35
-
36
-
37
-
38
-
39
-
40
-
41
-
42
-
43
-
44
-
45
-
46
-
47
-
48
 |
 |