Intel SBX44 User Guide - Page 35
Insert the riser card A from the option kit into an IDE connector on the blade server system
 |
View all Intel SBX44 manuals
Add to My Manuals
Save this manual to your list of manuals |
Page 35 highlights
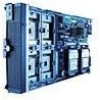
F D E B G C A TP00439 Complete the following steps to install a 2.5-inch IDE hard disk drive. ✏ NOTE Do not install a drive into IDE connector 2 if you intend to also install an I/O expansion option. The I/O expansion option occupies the same area as the second IDE drive. 1. Review the information in "General Safety" and "Electrical Safety" beginning on page vi and "Installation guidelines" on page 19. 2. Shut down the operating system, turn off the blade server, and remove the blade server from the system chassis. See "Removing the blade server from the system chassis" on page 19 for instructions. 3. Carefully lay the blade server on a flat, non-conductive surface. 4. Open the blade server cover. See "Opening the blade server cover" on page 20 for instructions. 5. Insert the riser card (A) from the option kit into an IDE connector on the blade server system board. Important: Drives must be installed in the following order: IDE connector 1 first, then IDE connector 2. 6. Place the hard disk drive tray (B) from the option kit over the riser card as shown in the illustration, aligning the tray with the screw holes (C) on the system board. Two of the screw holes have screws in them. Installing options 23
-
 1
1 -
2
-
3
-
4
-
5
-
6
-
7
-
8
-
9
-
10
-
11
-
12
-
13
-
14
-
15
-
16
-
17
-
18
-
19
-
20
-
21
-
22
-
23
-
24
-
25
-
26
-
27
-
28
-
29
-
 30
30 -
 31
31 -
 32
32 -
 33
33 -
 34
34 -
 35
35 -
 36
36 -
 37
37 -
 38
38 -
 39
39 -
 40
40 -
41
-
42
-
43
-
44
-
45
-
46
-
47
-
48
-
49
-
50
-
51
-
52
-
53
-
54
-
55
-
56
-
57
-
58
-
59
-
60
-
61
-
62
-
63
-
64
-
65
-
66
-
67
-
68
-
69
-
70
-
71
-
72
-
73
-
74
-
75
-
76
-
77
-
78
-
79
-
80
-
81
-
82
-
83
-
84
-
85
-
86
-
87
-
88
-
89
-
90
-
91
-
92
 |
 |
