Intel SBX44 User Guide - Page 50
Push the tray handle to the closed locked position.
 |
View all Intel SBX44 manuals
Add to My Manuals
Save this manual to your list of manuals |
Page 50 highlights
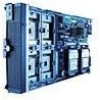
D B C A TP00392 Complete the following steps to install a drive in a storage expansion unit. Attention: To maintain proper system cooling, do not operate the system chassis for more than one minute without either a drive or a filler panel installed in each storage expansion unit bay. 1. Review the information in "General Safety" and "Electrical Safety" beginning on page vi and "Installation guidelines" on page 19. 2. Remove the filler panel (A) from one of the empty hot-swap bays by inserting your finger into the depression at the top of the filler panel and pulling it away from the expansion unit. 3. Install the hard disk drive (B): a. Ensure that the tray handle (C) is open (that is, perpendicular to the drive). b. Align the drive assembly with the guide rails in the bay. c. Gently push the drive assembly into the bay until the drive stops. d. Push the tray handle to the closed (locked) position. e. Check the hard disk drive LEDs (D) to verify that the hard disk drive is operating properly. • If the amber hard disk drive status LED for a drive is lit continuously, that drive is faulty and needs to be replaced. • If the green hard disk drive activity LED is flashing, the drive is being accessed. See the documentation that comes with the expansion unit for information about configuring the expansion unit and SCSI hard disk drives. 38 Intel® Server Compute Blade SBX44: Installation and User's Guide
-
 1
1 -
2
-
3
-
4
-
5
-
6
-
7
-
8
-
9
-
10
-
11
-
12
-
13
-
14
-
15
-
16
-
17
-
18
-
19
-
20
-
21
-
22
-
23
-
24
-
25
-
26
-
27
-
28
-
29
-
30
-
31
-
32
-
33
-
34
-
35
-
36
-
37
-
38
-
39
-
40
-
41
-
42
-
43
-
44
-
 45
45 -
 46
46 -
 47
47 -
 48
48 -
 49
49 -
 50
50 -
 51
51 -
 52
52 -
 53
53 -
 54
54 -
 55
55 -
56
-
57
-
58
-
59
-
60
-
61
-
62
-
63
-
64
-
65
-
66
-
67
-
68
-
69
-
70
-
71
-
72
-
73
-
74
-
75
-
76
-
77
-
78
-
79
-
80
-
81
-
82
-
83
-
84
-
85
-
86
-
87
-
88
-
89
-
90
-
91
-
92
 |
 |
