Intel SBX44 User Guide - Page 82
on the flex cable backer board.
 |
View all Intel SBX44 manuals
Add to My Manuals
Save this manual to your list of manuals |
Page 82 highlights
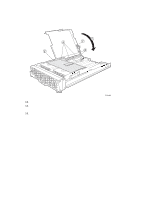
10. Reinstall the IDE drive trays. Tighten the four screws (A) on each tray. ✏ NOTE If an I/O expansion card is installed in place of an IDE drive, then reinstall the I/O expansion card tray and tighten the screws. A TP00462 11. Reconnect the three flex ribbon cables (A) to the connectors on the underside of the I/O board. ✏ Important ✏ Flex ribbon cables can be damaged if not properly handled during reconnection. Use the following recommended procedure to reconnect a flex ribbon cable to its I/O board connector: a. Carefully bend each flex ribbon cable around the piano hinge on the I/O board. b. Gently insert each flex ribbon cable into its appropriate connector on the I/O board, taking care to line up the cable connector correctly with the I/O board connector. c. Once all the flex ribbon cables have been reconnected, ensure each cable connector has achieved flush contact with its respective I/O board connector by pressing firmly on the flex cable backer board. Reconnect the power cable to the connector (B) on the topside of the I/O board. Tuck the power cable into the two hooks (C) on the underside of the I/O board. Swing the I/O board assembly down (D). It should snap into place. Reinstall the clear plastic air baffle (E). 70 Intel® Server Compute Blade SBX44: Installation and User's Guide
-
 1
1 -
2
-
3
-
4
-
5
-
6
-
7
-
8
-
9
-
10
-
11
-
12
-
13
-
14
-
15
-
16
-
17
-
18
-
19
-
20
-
21
-
22
-
23
-
24
-
25
-
26
-
27
-
28
-
29
-
30
-
31
-
32
-
33
-
34
-
35
-
36
-
37
-
38
-
39
-
40
-
41
-
42
-
43
-
44
-
45
-
46
-
47
-
48
-
49
-
50
-
51
-
52
-
53
-
54
-
55
-
56
-
57
-
58
-
59
-
60
-
61
-
62
-
63
-
64
-
65
-
66
-
67
-
68
-
69
-
70
-
71
-
72
-
73
-
74
-
75
-
76
-
 77
77 -
 78
78 -
 79
79 -
 80
80 -
 81
81 -
 82
82 -
 83
83 -
 84
84 -
 85
85 -
 86
86 -
 87
87 -
88
-
89
-
90
-
91
-
92
 |
 |
