Intel SBX44 User Guide - Page 73
Once all the flex ribbon cables have been reconnected, ensure each cable connector, board. Again
 |
View all Intel SBX44 manuals
Add to My Manuals
Save this manual to your list of manuals |
Page 73 highlights
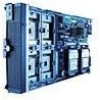
15. Reinstall the retention mechanism assembly and tighten the six captive screws (A). Reconnect the three flex ribbon cables to the appropriate connectors on the CPU board (B) first and then reconnect the flex ribbon cables to the appropriate connectors on the I/O board (C). ✏ Important ✏ Flex ribbon cables can be damaged if not properly handled during reconnection. Use the following recommended procedure to reconnect the flex ribbon cables: • Gently insert each flex ribbon cable into its appropriate connector on the CPU board, taking care to line up the cable connector correctly with the CPU board connector. • Carefully bend each flex ribbon cable around the piano hinge on the I/O board. • Next, gently insert each flex ribbon cable into its appropriate connector on the I/O board. Again, be sure to line up the cable connector correctly with the I/O board connector. • Once all the flex ribbon cables have been reconnected, ensure each cable connector has achieved flush contact with its respective board connector by pressing firmly on the flex cable backer board. Reconnect the I/O board power cable (D) to the appropriate connector on the CPU board. Tuck the power cable into the storage hooks (E) on the underside of the I/O board assembly. BC E A D TP00464 Service replaceable units 61
-
 1
1 -
2
-
3
-
4
-
5
-
6
-
7
-
8
-
9
-
10
-
11
-
12
-
13
-
14
-
15
-
16
-
17
-
18
-
19
-
20
-
21
-
22
-
23
-
24
-
25
-
26
-
27
-
28
-
29
-
30
-
31
-
32
-
33
-
34
-
35
-
36
-
37
-
38
-
39
-
40
-
41
-
42
-
43
-
44
-
45
-
46
-
47
-
48
-
49
-
50
-
51
-
52
-
53
-
54
-
55
-
56
-
57
-
58
-
59
-
60
-
61
-
62
-
63
-
64
-
65
-
66
-
67
-
 68
68 -
 69
69 -
 70
70 -
 71
71 -
 72
72 -
 73
73 -
 74
74 -
 75
75 -
 76
76 -
 77
77 -
 78
78 -
79
-
80
-
81
-
82
-
83
-
84
-
85
-
86
-
87
-
88
-
89
-
90
-
91
-
92
 |
 |
