Intel SBXD132 User Guide - Page 28
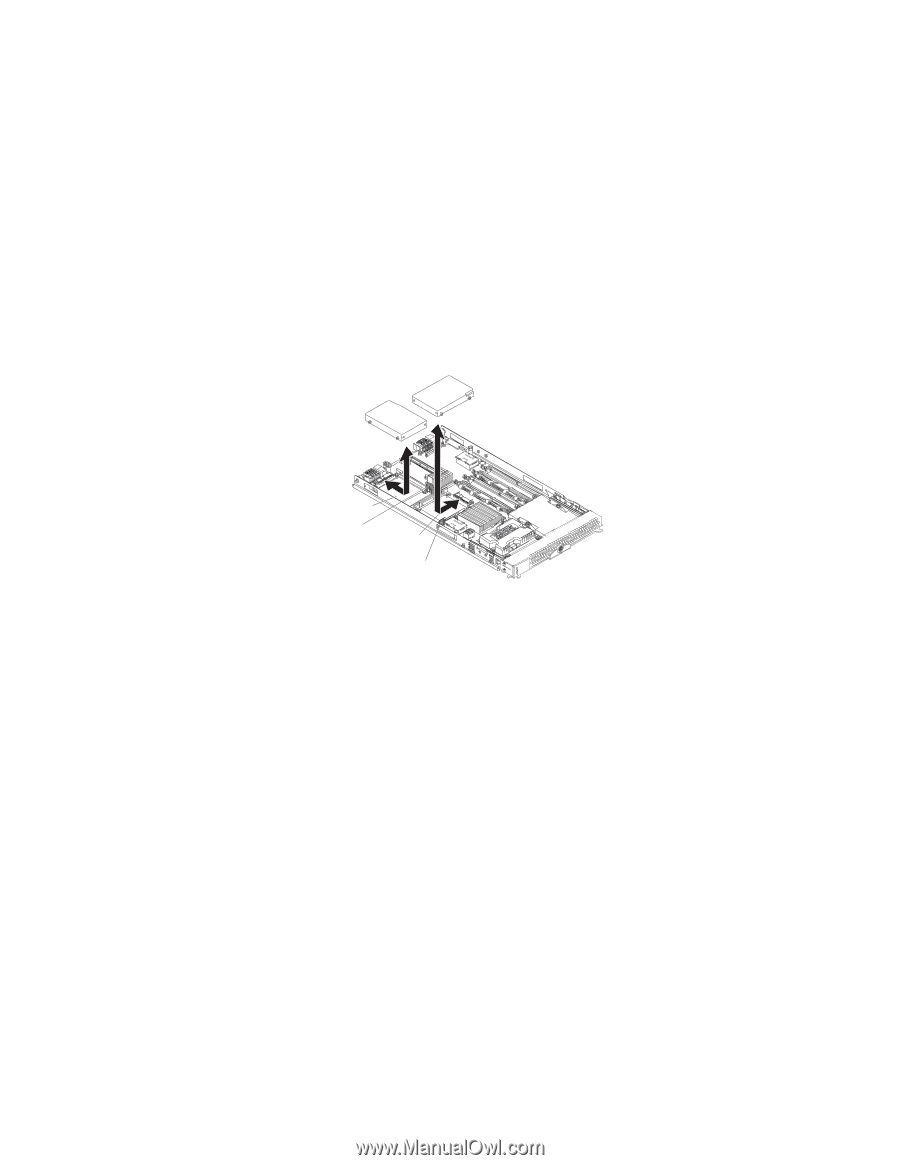
Installing a SAS Hard Disk Drive, Locate SAS connector 0 J136 or SAS connector 1 J137.
 |
UPC - 735858189408
View all Intel SBXD132 manuals
Add to My Manuals
Save this manual to your list of manuals |
Page 28 highlights
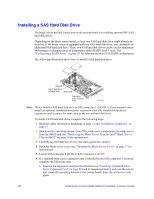
Installing a SAS Hard Disk Drive The blade server has two connectors on the system board for installing optional SFF SAS hard disk drives. Depending on the blade server model, at least one SAS hard disk drive might already be installed. If the blade server is equipped with one SAS hard disk drive, you can install an additional SAS hard disk drive. These two SAS hard disk drives can be used to implement and manage a redundant array of independent disks (RAID) level-1 array. See "Configuring a RAID Array" on page 63 for information about SAS RAID configuration. The following illustration shows how to install a SAS hard disk drive. SAS ID 1 Hard disk drive release lever SAS ID 0 Hard disk drive release lever AF000934 Note: Do not install a SAS hard disk drive in SAS connector 1 (SAS ID 1) if you intend to also install an optional standard-form-factor expansion card. The standard-form-factor expansion card occupies the same area as the second hard disk drive. To install a SAS hard disk drive, complete the following steps: 1. Read the safety information beginning on page vii and "Installation Guidelines" on page 15. 2. Shut down the operating system, turn off the blade server, and remove the blade server from the SBCE unit (see "Removing the Blade Server from the Intel® Blade Server Chassis SBCE" on page 16 for instructions). 3. Carefully lay the blade server on a flat, static-protective surface. 4. Open the blade server cover (see "Opening the Blade Server Cover" on page 17 for instructions). 5. Locate SAS connector 0 (J136) or SAS connector 1 (J137). 6. If a standard-form-factor expansion card is installed in the SAS connector 1 location, complete the following steps: a. Remove the expansion card (see the illustration in "Installing a Standard-formfactor Expansion Card" on page 30) and its mounting bracket, and save the screws that secure the mounting bracket to the system board. Store the screws in a safe place. 20 Intel® Server Compute Blade SBXD132 Installation and User's Guide
-
 1
1 -
2
-
3
-
4
-
5
-
6
-
7
-
8
-
9
-
10
-
11
-
12
-
13
-
14
-
15
-
16
-
17
-
18
-
19
-
20
-
21
-
22
-
 23
23 -
 24
24 -
 25
25 -
 26
26 -
 27
27 -
 28
28 -
 29
29 -
 30
30 -
 31
31 -
 32
32 -
 33
33 -
34
-
35
-
36
-
37
-
38
-
39
-
40
-
41
-
42
-
43
-
44
-
45
-
46
-
47
-
48
-
49
-
50
-
51
-
52
-
53
-
54
-
55
-
56
-
57
-
58
-
59
-
60
-
61
-
62
-
63
-
64
-
65
-
66
-
67
-
68
-
69
-
70
-
71
-
72
-
73
-
74
-
75
-
76
-
77
-
78
-
79
-
80
-
81
-
82
-
83
-
84
-
85
-
86
-
87
-
88
-
89
-
90
-
91
-
92
-
93
-
94
-
95
-
96
-
97
-
98
-
99
-
100
-
101
-
102
-
103
-
104
-
105
-
106
-
107
-
108
-
109
-
110
-
111
-
112
-
113
-
114
-
115
-
116
-
117
-
118
-
119
-
120
-
121
-
122
-
123
-
124
-
125
-
126
-
127
-
128
-
129
-
130
 |
 |