Intel SBXD132 User Guide - Page 61
Viewing the Array Configuration, Using the ServeRAID Manager Program, Light Path Diagnostics*
 |
UPC - 735858189408
View all Intel SBXD132 manuals
Add to My Manuals
Save this manual to your list of manuals |
Page 61 highlights
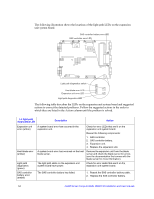
Note: Hard disk drives in an array can have different capacities, but the RAID controller treats them as if they all have the capacity of the smallest hard disk drive. 4. From the list of available drives, select the drives that you want to include in the array and press Enter. 5. From the list of RAID levels available, select the one you want to use. 6. Follow the instructions on the screen to complete the configuration; then, select Done to exit. 7. Restart the server. Viewing the Array Configuration To view information about the RAID array, complete the following steps: 1. Start the Adaptec RAID Configuration Utility program (see "Starting the Adaptec RAID Configuration Utility Program" on page 52). 2. Select Array Configuration Utility. 3. From the Main menu, select Manage Arrays. 4. Select an array and press Enter. 5. To exit from the program, press Esc. Using the ServeRAID Manager Program The ServeRAID Support CD contains the ServeRAID Manager program, which you can use to configure the hard disk drives for use with the ServeRAID SAS controller in the expansion unit. For details about using this programs, see the documentation that comes on the IBM ServeRAID Support CD. Light Path Diagnostics* Light path diagnostics is a system of LEDs on the system board of the expansion unit. When an error occurs, these LEDs can be lit to help identify the source of the error. To view the light path LEDs, remove the blade server and expansion unit from the SBCE unit; then, press and hold the light path diagnostics switch for a maximum of 25 seconds. The light path diagnostics LED will be lit to indicate that there is enough power present to light the error LEDs, and the LED for the failing component also will be lit. Intel® Server Compute Blade SBXD132 Installation and User's Guide 53
-
 1
1 -
2
-
3
-
4
-
5
-
6
-
7
-
8
-
9
-
10
-
11
-
12
-
13
-
14
-
15
-
16
-
17
-
18
-
19
-
20
-
21
-
22
-
23
-
24
-
25
-
26
-
27
-
28
-
29
-
30
-
31
-
32
-
33
-
34
-
35
-
36
-
37
-
38
-
39
-
40
-
41
-
42
-
43
-
44
-
45
-
46
-
47
-
48
-
49
-
50
-
51
-
52
-
53
-
54
-
55
-
 56
56 -
 57
57 -
 58
58 -
 59
59 -
 60
60 -
 61
61 -
 62
62 -
 63
63 -
 64
64 -
 65
65 -
 66
66 -
67
-
68
-
69
-
70
-
71
-
72
-
73
-
74
-
75
-
76
-
77
-
78
-
79
-
80
-
81
-
82
-
83
-
84
-
85
-
86
-
87
-
88
-
89
-
90
-
91
-
92
-
93
-
94
-
95
-
96
-
97
-
98
-
99
-
100
-
101
-
102
-
103
-
104
-
105
-
106
-
107
-
108
-
109
-
110
-
111
-
112
-
113
-
114
-
115
-
116
-
117
-
118
-
119
-
120
-
121
-
122
-
123
-
124
-
125
-
126
-
127
-
128
-
129
-
130
 |
 |
