Intel SBXD132 User Guide - Page 31
Save Settings, Opening the Blade Server Cover
 |
UPC - 735858189408
View all Intel SBXD132 manuals
Add to My Manuals
Save this manual to your list of manuals |
Page 31 highlights
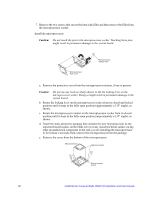
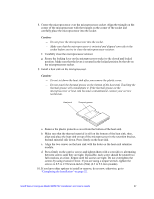
Pair Second DIMM connectors 2 (system board J142) and 4 (system board J144) 2 (Memory and I/O Expansion Blade J19) and 4 (Memory and I/O Expansion Blade J21) • All DIMMs in a pair or group must be the same size, speed, type, technology, and physical design. You can mix compatible DIMMs from different manufacturers. • All DIMMs must have the same speed. However, different pairs or groups of DIMMs do not have to be of the same size, type, technology, and physical design. • Install only fully-buffered double-date rate dual-channel (FB-DDR2), PC2-4200, registered SDRAM with ECC DIMMs. For a current list of supported DIMMs for the blade server, see http://support.intel.com/support/. • Installing or removing DIMMs changes the configuration information for the blade server. After installing or removing a DIMM, you must change and save the new configuration information by using the Configuration/Setup Utility program. When you restart the blade server, it displays a message indicating that the memory configuration has changed. Start the Configuration/Setup Utility program and select Save Settings (see "Configuration/Setup Utility Menu Choices" on page 58 for more information). DIMM Retaining clip To install a DIMM, complete the following steps: 1. Read the safety information beginning on page vii and "Installation Guidelines" on page 15. 2. Read the documentation that comes with the DIMMs. 3. Shut down the operating system, turn off the blade server, and remove the blade server from the SBCE unit (see "Removing the Blade Server from the Intel® Blade Server Chassis SBCE" on page 16 for instructions). 4. Carefully lay the blade server on a flat, static-protective surface. 5. Open the blade server cover (see "Opening the Blade Server Cover" on page 17 for instructions). Intel® Server Compute Blade SBXD132 Installation and User's Guide 23
-
 1
1 -
2
-
3
-
4
-
5
-
6
-
7
-
8
-
9
-
10
-
11
-
12
-
13
-
14
-
15
-
16
-
17
-
18
-
19
-
20
-
21
-
22
-
23
-
24
-
25
-
 26
26 -
 27
27 -
 28
28 -
 29
29 -
 30
30 -
 31
31 -
 32
32 -
 33
33 -
 34
34 -
 35
35 -
 36
36 -
37
-
38
-
39
-
40
-
41
-
42
-
43
-
44
-
45
-
46
-
47
-
48
-
49
-
50
-
51
-
52
-
53
-
54
-
55
-
56
-
57
-
58
-
59
-
60
-
61
-
62
-
63
-
64
-
65
-
66
-
67
-
68
-
69
-
70
-
71
-
72
-
73
-
74
-
75
-
76
-
77
-
78
-
79
-
80
-
81
-
82
-
83
-
84
-
85
-
86
-
87
-
88
-
89
-
90
-
91
-
92
-
93
-
94
-
95
-
96
-
97
-
98
-
99
-
100
-
101
-
102
-
103
-
104
-
105
-
106
-
107
-
108
-
109
-
110
-
111
-
112
-
113
-
114
-
115
-
116
-
117
-
118
-
119
-
120
-
121
-
122
-
123
-
124
-
125
-
126
-
127
-
128
-
129
-
130
 |
 |