Intel SBXD132 User Guide - Page 33
Opening the Blade Server Cover on Removing the Blade Server from the Intel
 |
UPC - 735858189408
View all Intel SBXD132 manuals
Add to My Manuals
Save this manual to your list of manuals |
Page 33 highlights
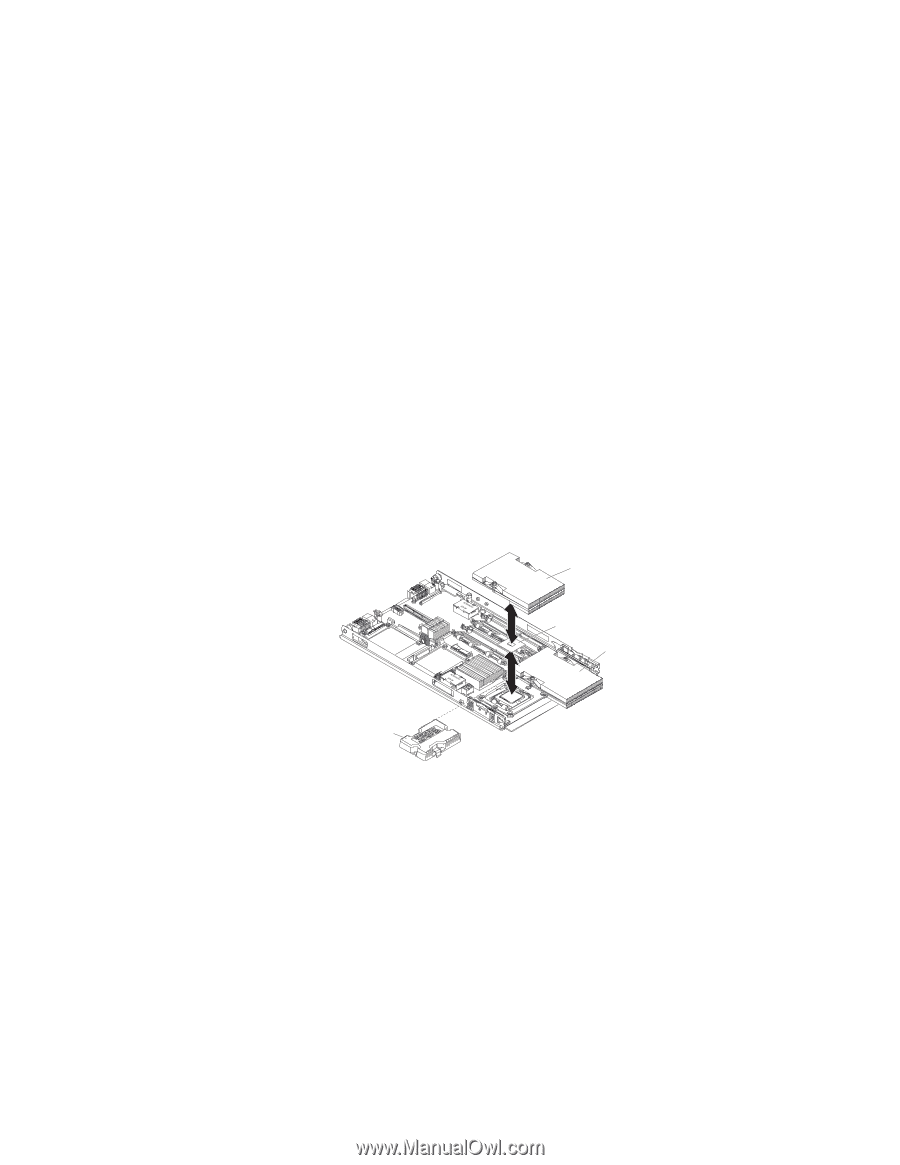
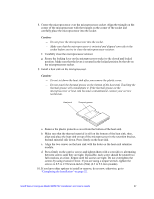
The following notes describe the type of microprocessor that the server supports and other information that you must consider when installing a microprocessor: • Always install microprocessors that have the same cache size and type, the same clock speed, and identical internal and external clock frequencies (including system bus speed). • Make sure that the microprocessor with the lowest feature set is the startup (bootstrap) microprocessor, which is installed in the microprocessor 1 socket (U66). • For a list of microprocessors that the blade server supports, go to http:// support.intel.com/support/. • Before installing a new microprocessor, download and install the most current level of BIOS code, from http://support.intel.com/support/. • The microprocessors terminate themselves; therefore, no terminator card is required if microprocessor socket 2 is empty. However, for proper airflow, this socket must contain a microprocessor heat-sink filler, sometimes called a microprocessor baffle. • The microprocessor speeds are automatically set for this server; therefore, you do not have to set any microprocessor frequency-selection jumpers or switches. The following illustration shows how to install the second microprocessor on the system board for the blade server. Heat sink Microprocessor 2 Microprocessor 1 and heat sink Microprocessor heat sink filler To install an additional microprocessor, complete the following steps: 1. Read the safety information beginning on page vii and "Installation Guidelines" on page 15. 2. Shut down the operating system, turn off the blade server, and remove the blade server from the SBCE unit (see "Removing the Blade Server from the Intel® Blade Server Chassis SBCE" on page 16 for instructions). 3. Carefully lay the blade server on a flat, static-protective surface. 4. Open the blade server cover (see "Opening the Blade Server Cover" on page 17 for instructions). 5. Remove the bezel assembly (see "Installing the Blade Server Bezel Assembly" on page 33 for instructions). 6. Locate the microprocessor socket on the system board. Intel® Server Compute Blade SBXD132 Installation and User's Guide 25
-
 1
1 -
2
-
3
-
4
-
5
-
6
-
7
-
8
-
9
-
10
-
11
-
12
-
13
-
14
-
15
-
16
-
17
-
18
-
19
-
20
-
21
-
22
-
23
-
24
-
25
-
26
-
27
-
 28
28 -
 29
29 -
 30
30 -
 31
31 -
 32
32 -
 33
33 -
 34
34 -
 35
35 -
 36
36 -
 37
37 -
 38
38 -
39
-
40
-
41
-
42
-
43
-
44
-
45
-
46
-
47
-
48
-
49
-
50
-
51
-
52
-
53
-
54
-
55
-
56
-
57
-
58
-
59
-
60
-
61
-
62
-
63
-
64
-
65
-
66
-
67
-
68
-
69
-
70
-
71
-
72
-
73
-
74
-
75
-
76
-
77
-
78
-
79
-
80
-
81
-
82
-
83
-
84
-
85
-
86
-
87
-
88
-
89
-
90
-
91
-
92
-
93
-
94
-
95
-
96
-
97
-
98
-
99
-
100
-
101
-
102
-
103
-
104
-
105
-
106
-
107
-
108
-
109
-
110
-
111
-
112
-
113
-
114
-
115
-
116
-
117
-
118
-
119
-
120
-
121
-
122
-
123
-
124
-
125
-
126
-
127
-
128
-
129
-
130
 |
 |