JVC EX A10 Instructions - Page 48
Press CLOCK/TIMER.
 |
UPC - 046838022005
View all JVC EX A10 manuals
Add to My Manuals
Save this manual to your list of manuals |
Page 48 highlights
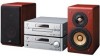
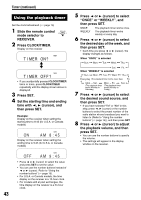
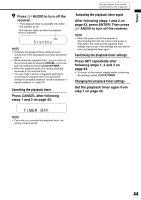
Timer (continued) Using the playback timer Set the clock beforehand. (A page 15) 1 Slide the remote control mode selector to RECEIVER. 2 Press CLOCK/TIMER. Display on the receiver 5 Press 2 or 3 (cursor) to select "ONCE" or "WEEKLY", and then press SET. ONCE The playback timer works once. WEEKLY The playback timer works weekly or every day. 6 Press 2 or 3 (cursor) to select the desired day of the week, and then press SET. • Each time you press 2 or 3 (cursor), the display changes as follows. When "ONCE" is selected • If you accidentally pressed CLOCK/TIMER twice or more, press CLOCK/TIMER repeatedly until the display shown above is displayed. 3 Press SET. 4 Set the starting time and ending time with 2, 3 (cursor), and then press SET. Example: Display on the receiver when setting the starting time to 8:45 (for U.S.A. or Canada models) Display on the receiver when setting the ending time to 9:45 (for U.S.A. or Canada models) When "WEEKLY" is selected (The playback timer works every day.) (The playback timer (The playback timer works Monday to works Monday to Saturday.) Friday.) 7 Press 2 or 3 (cursor) to select the desired sound source, and then press SET. • If you have selected "FM" or "AM" in this step, press 2, 3 (cursor) or the number buttons to select the preset number of the radio station whose broadcast you want to listen to (Refer to "Using the number buttons" (A page 15)), and then press SET. 8 Press 2 or 3 (cursor) to adjust the playback volume, and then press SET. • You can use the number buttons to specify the volume. • The settings will appear in the display window on the receiver. 43 • Press 2 or 3 (cursor) to select the value and press SET to set the value. • You can use the number buttons instead of 2 or 3 (cursor). Refer to "Using the number buttons" (A page 15). • For U.S.A. or Canada models, the time display on the receiver is a 12-hour clock. • For models sold at post exchanges, the time display on the receiver is a 24-hour clock.
-
 1
1 -
2
-
3
-
4
-
5
-
6
-
7
-
8
-
9
-
10
-
11
-
12
-
13
-
14
-
15
-
16
-
17
-
18
-
19
-
20
-
21
-
22
-
23
-
24
-
25
-
26
-
27
-
28
-
29
-
30
-
31
-
32
-
33
-
34
-
35
-
36
-
37
-
38
-
39
-
40
-
41
-
42
-
 43
43 -
 44
44 -
 45
45 -
 46
46 -
 47
47 -
 48
48 -
 49
49 -
 50
50 -
 51
51 -
 52
52 -
 53
53 -
54
-
55
-
56
-
57
-
58
-
59
-
60
 |
 |