JVC VN-C625U Instructions - Page 13
Step 1 Connection/Installation, 1-1 Connecting Cables, 1. Connection Procedure, Cautions
 |
UPC - 046838018688
View all JVC VN-C625U manuals
Add to My Manuals
Save this manual to your list of manuals |
Page 13 highlights
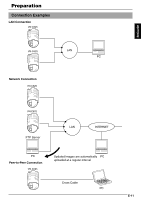
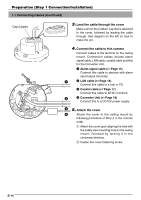
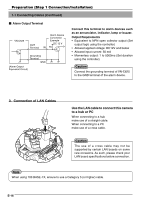
ENGLISH Preparation (Step 1 Connection/Installation) 1-1 Connecting Cables Cautions ● Attachment of a embedded cover in the ceiling (recess bracket) may be mandatory in certain regions. If this is so, ensure that the embedded cover (recess bracket) is securely attached before installing the camera. ● Ensure to attach the cover for the ceiling mount. Installation is not possible without attaching the cover. In addition, the cover also prevents penetration of foreign objects into the ceiling mount. Penetration of foreign objects may cause a malfunction or, in the worst scenario, cause smoking or fire. 1. Connection Procedure 75 Cover Fastening Screw Cover 1. Make a hole in the ceiling Make use of the template supplied to open a hole (75) for leading the connection cable through the rear side of the ceiling. 2. Remove the cover To remove the cover from the ceiling mount, loosen the fastening screw on the cover, followed by turning the cover in the anticlockwise direction. Safety Wire Mounting Hole Ceiling Mount E-13
-
 1
1 -
2
-
3
-
4
-
5
-
6
-
7
-
 8
8 -
 9
9 -
 10
10 -
 11
11 -
 12
12 -
 13
13 -
 14
14 -
 15
15 -
 16
16 -
 17
17 -
 18
18 -
19
-
20
-
21
-
22
-
23
-
24
-
25
-
26
-
27
-
28
-
29
-
30
-
31
-
32
-
33
-
34
-
35
-
36
-
37
-
38
-
39
-
40
-
41
-
42
-
43
-
44
-
45
-
46
-
47
-
48
-
49
-
50
-
51
-
52
-
53
-
54
-
55
-
56
-
57
-
58
-
59
-
60
-
61
-
62
-
63
-
64
-
65
-
66
-
67
-
68
-
69
-
70
-
71
-
72
-
73
-
74
-
75
-
76
-
77
-
78
-
79
-
80
-
81
-
82
-
83
-
84
-
85
-
86
-
87
-
88
-
89
-
90
-
91
-
92
-
93
-
94
-
95
-
96
-
97
-
98
-
99
-
100
-
101
-
102
-
103
-
104
-
105
-
106
-
107
-
108
-
109
-
110
-
111
-
112
-
113
-
114
-
115
-
116
-
117
-
118
-
119
-
120
-
121
-
122
-
123
-
124
-
125
-
126
-
127
-
128
-
129
-
130
-
131
-
132
-
133
-
134
-
135
-
136
-
137
-
138
-
139
-
140
-
141
-
142
-
143
-
144
-
145
-
146
-
147
-
148
-
149
-
150
-
151
-
152
-
153
-
154
-
155
-
156
-
157
-
158
-
159
-
160
-
161
-
162
-
163
-
164
-
165
-
166
-
167
-
168
-
169
-
170
-
171
-
172
-
173
-
174
-
175
-
176
-
177
-
178
-
179
-
180
-
181
-
182
-
183
-
184
-
185
-
186
-
187
 |
 |
