JVC VN-C625U Instructions - Page 22
Installing the Camera, Attach the safety wire to prevent the, camera from falling down
 |
UPC - 046838018688
View all JVC VN-C625U manuals
Add to My Manuals
Save this manual to your list of manuals |
Page 22 highlights
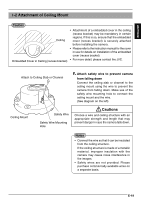
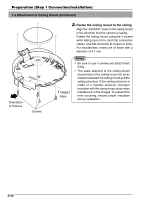
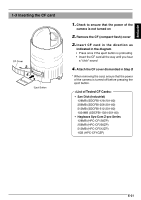
Preparation (Step 1 Connection/Installation) 1-4 Installing the Camera Ceiling Mount Locking Screw Camera Camera Clamping Bracket 1. Attach the safety wire to prevent the camera from falling down Safety Wire As shown in the diagram, pull out the safety wire from the ceiling mount and hang it to the safety wire fastening hook on the camera. Be sure to connect the safety wire to prevent Fastening Hook for Safety Wire the camera from falling down. Cautions • Do not connect cameras other than VNC625 to the ceiling mount. Doing so may cause the camera to malfunction. • Be sure to connect the safety wire. Otherwise, the camera may fall to the ground. • Do not leave the camera hung with the safety wire. The spring characteristic of the safety wire will lose. It might not be able to mount properly when inserting the camera unit to the ceiling mount if the wire is caught. 2. Check that the locking screw is loosened The camera cannot be properly installed if the &Mark locking screw of the ceiling mount is not loosened. 3. Fit the camera to the ceiling mount Align the "^" mark of the camera unit with "&" mark of the ceiling mount, and fit the camera to the ceiling mount upon checking the positions of the camera clamping bracket as well as the locking screw on the ceiling mount. E-22
-
 1
1 -
2
-
3
-
4
-
5
-
6
-
7
-
8
-
9
-
10
-
11
-
12
-
13
-
14
-
15
-
16
-
 17
17 -
 18
18 -
 19
19 -
 20
20 -
 21
21 -
 22
22 -
 23
23 -
 24
24 -
 25
25 -
 26
26 -
 27
27 -
28
-
29
-
30
-
31
-
32
-
33
-
34
-
35
-
36
-
37
-
38
-
39
-
40
-
41
-
42
-
43
-
44
-
45
-
46
-
47
-
48
-
49
-
50
-
51
-
52
-
53
-
54
-
55
-
56
-
57
-
58
-
59
-
60
-
61
-
62
-
63
-
64
-
65
-
66
-
67
-
68
-
69
-
70
-
71
-
72
-
73
-
74
-
75
-
76
-
77
-
78
-
79
-
80
-
81
-
82
-
83
-
84
-
85
-
86
-
87
-
88
-
89
-
90
-
91
-
92
-
93
-
94
-
95
-
96
-
97
-
98
-
99
-
100
-
101
-
102
-
103
-
104
-
105
-
106
-
107
-
108
-
109
-
110
-
111
-
112
-
113
-
114
-
115
-
116
-
117
-
118
-
119
-
120
-
121
-
122
-
123
-
124
-
125
-
126
-
127
-
128
-
129
-
130
-
131
-
132
-
133
-
134
-
135
-
136
-
137
-
138
-
139
-
140
-
141
-
142
-
143
-
144
-
145
-
146
-
147
-
148
-
149
-
150
-
151
-
152
-
153
-
154
-
155
-
156
-
157
-
158
-
159
-
160
-
161
-
162
-
163
-
164
-
165
-
166
-
167
-
168
-
169
-
170
-
171
-
172
-
173
-
174
-
175
-
176
-
177
-
178
-
179
-
180
-
181
-
182
-
183
-
184
-
185
-
186
-
187
 |
 |
