Kenwood TS-480HX Operation Manual - Page 13
Portable Bracket E-type Only, Fuses
 |
View all Kenwood TS-480HX manuals
Add to My Manuals
Save this manual to your list of manuals |
Page 13 highlights
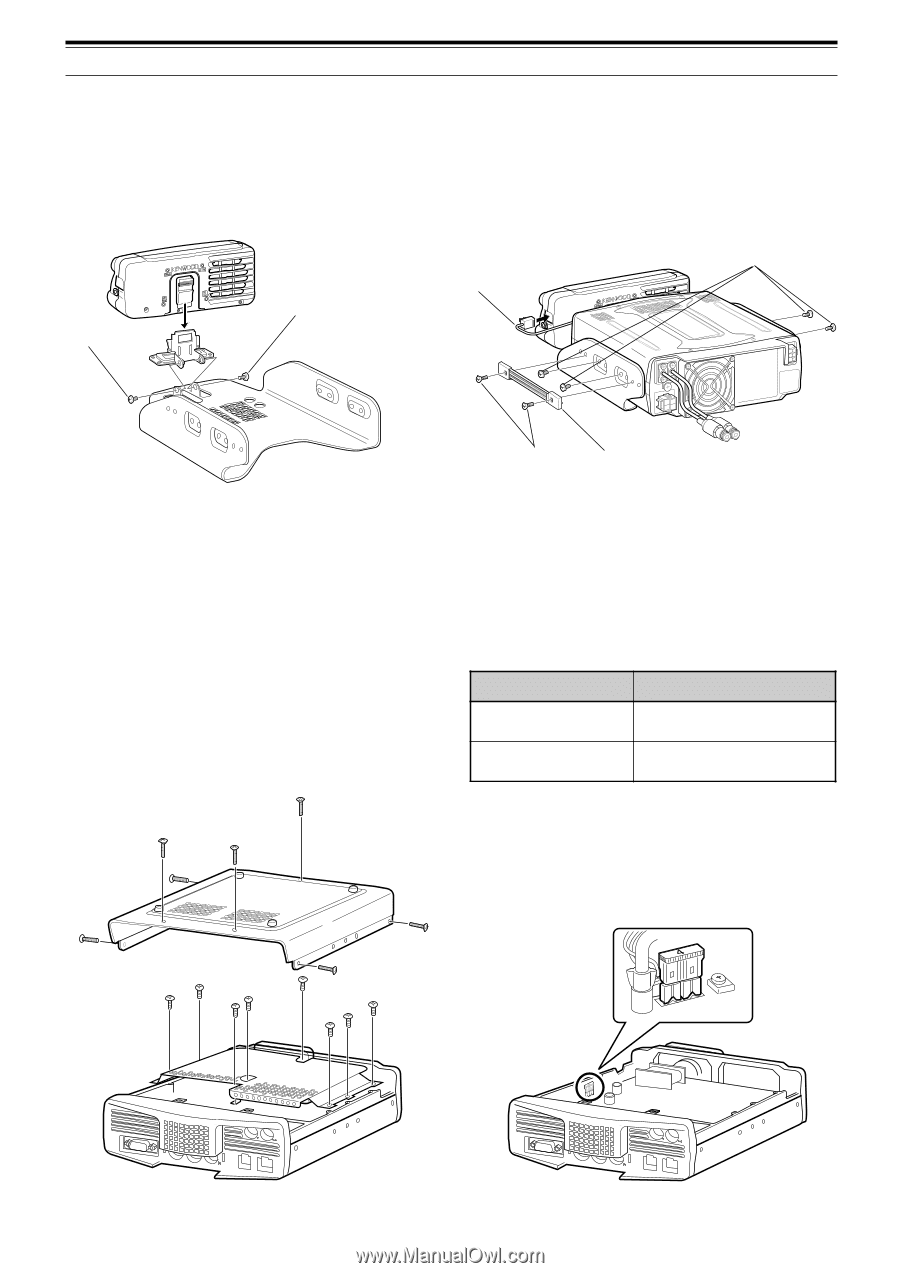
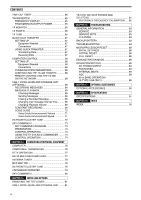
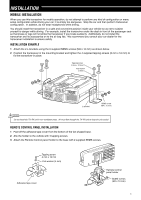
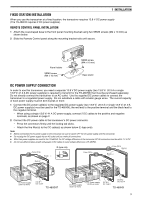
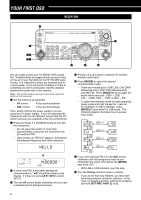
1 INSTALLATION PORTABLE BRACKET (E-TYPE ONLY) Using the supplied Portable Bracket, you can carry the Remote Control panel and TX/ RX unit together. Two TX/ RX unit positions are available. If you do not use the EXT.SP, REMOTE and DATA connectors, place the TX/ RX unit in front position. If you use the EXT.SP, REMOTE or DATA connector, place the TX/ RX unit to the back position. You can also attach the handle as shown if necessary. Use the supplied short cable (RJ11/ 20 cm) to connect the Remote Control panel and the TX/ RX unit. SEMS screw (M4 x 10 mm) SEMS screw (M4 x 10 mm) RJ11/ 20 cm Binding head screw (M4 x 8 mm) 2 1 D13C.8V1 GND AT DC 2 13.8V Flat-head screw Carrying handle (M4 x 12 mm) FUSES The following fuses are used in the TS-480HX/ SAT transceiver. If a fuse blows, determine the cause then correct the problem. Only after the problem has been resolved, replace the blown fuse with a new one with the specified ratings. If newly installed fuses continue to blow, disconnect the power plug and contact a KENWOOD service center or your dealer for assistance. 1 Remove 7 screws at the bottom of the TX/ RX unit. 2 Remove 8 screws inside of the TX/ RX unit. 3 Lift the shield cover. 4 Replace 4 A fuse. Fuse Location TS-480HX/ SAT (TX/ RX unit) Supplied DC power cable Fuse Current Rating 4A (For an external antenna tuner) 25 A PADDLE KEY PADDLE KEY COM COM PANEL PANEL MIC MIC REMOTE REMOTE DATA DATA EXT.SP EXT.SP 5
-
 1
1 -
2
-
3
-
4
-
5
-
6
-
7
-
 8
8 -
 9
9 -
 10
10 -
 11
11 -
 12
12 -
 13
13 -
 14
14 -
 15
15 -
 16
16 -
 17
17 -
 18
18 -
19
-
20
-
21
-
22
-
23
-
24
-
25
-
26
-
27
-
28
-
29
-
30
-
31
-
32
-
33
-
34
-
35
-
36
-
37
-
38
-
39
-
40
-
41
-
42
-
43
-
44
-
45
-
46
-
47
-
48
-
49
-
50
-
51
-
52
-
53
-
54
-
55
-
56
-
57
-
58
-
59
-
60
-
61
-
62
-
63
-
64
-
65
-
66
-
67
-
68
-
69
-
70
-
71
-
72
-
73
-
74
-
75
-
76
-
77
-
78
-
79
-
80
-
81
-
82
-
83
-
84
-
85
-
86
-
87
-
88
-
89
-
90
-
91
-
92
-
93
-
94
-
95
-
96
-
97
-
98
-
99
-
100
-
101
-
102
-
103
-
104
 |
 |