Kenwood TS-480HX Operation Manual - Page 96
Demonstration Mode, Microprocessor Reset
 |
View all Kenwood TS-480HX manuals
Add to My Manuals
Save this manual to your list of manuals |
Page 96 highlights
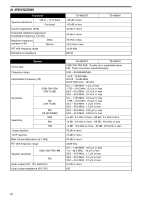
16 TROUBLESHOOTING MICROPROCESSOR RESET If your transceiver seems to be malfunctioning, resetting the microprocessor default settings may resolve the problem. There are 2 levels of resetting the microprocessor of the TS-480 transceiver: Partial Reset and Full Reset. INITIAL SETTINGS For each VFO, the factory defaults for the operating frequency and mode are as follows: • VFO A: 14.000.00 MHz/ USB • VFO B: 14.000.00 MHz/ USB The Memory channels and Quick Memory channels have no data stored. PARTIAL RESET Perform a Partial Reset if a key or control does not function according to the instructions in this manual. The following data is NOT erased by performing a Partial Reset. • Memory channel data • Menu settings • Antenna tuner preset data • ANT 1/ ANT 2 selection data • Frequency and mode data for the Auto Mode function • Various adjustment setting values Reset the transceiver by pressing [A/B / M/V]+[ ]. • A confirmation message appears when performing the Partial Reset. Press [A/B / M/V] to proceed. Otherwise, press any other key to cancel the Partial Reset and return to normal operation. • The VFOs reset to the factory default values. FULL RESET Perform a Full Reset if you want to erase all the data in all the memory channels. In addition, this function resets all the settings that you customized, to the factory defaults (i.e.- menu settings, antenna tuner preset data, etc.). Reset the transceiver by pressing [A=B/ SPLIT]+[ ]. A confirmation message appears when performing Full Reset. Press [A=B/ SPLIT] to proceed. Otherwise, press any other key to cancel the Full Reset and return to normal operation. When you perform the Full Reset: • All frequencies, modes, memory data, adjustment values, and AT preset data are set to the factory default values. DEMONSTRATION MODE The transceiver can be configured to enter the demonstration mode for display purposes. To enter the demonstration mode: 1 Switch the transceiver OFF. 2 Press [MENU/ F.LOCK]+[ ] to switch the transceiver ON. • The display brightness changes, the LED turns ON/ OFF, and alpha-numeric segments turn ON/ OFF automatically. • If you operate the transceiver while in the demonstration mode, the demonstration is temporarily paused. But, if no operation is performed for more than 10 seconds, the demonstration starts again. 3 To exit the demonstration mode, first turn the transceiver OFF, then press [MENU/ F.LOCK]+[ ] to turn the transceiver ON. Note: You cannot exit the demonstration mode by simply switching the transceiver OFF. You must switch the transceiver OFF then press [MENU/ F.LOCK]+[ ] to turn the transceiver ON in order to exit the demonstration mode. 88
-
 1
1 -
2
-
3
-
4
-
5
-
6
-
7
-
8
-
9
-
10
-
11
-
12
-
13
-
14
-
15
-
16
-
17
-
18
-
19
-
20
-
21
-
22
-
23
-
24
-
25
-
26
-
27
-
28
-
29
-
30
-
31
-
32
-
33
-
34
-
35
-
36
-
37
-
38
-
39
-
40
-
41
-
42
-
43
-
44
-
45
-
46
-
47
-
48
-
49
-
50
-
51
-
52
-
53
-
54
-
55
-
56
-
57
-
58
-
59
-
60
-
61
-
62
-
63
-
64
-
65
-
66
-
67
-
68
-
69
-
70
-
71
-
72
-
73
-
74
-
75
-
76
-
77
-
78
-
79
-
80
-
81
-
82
-
83
-
84
-
85
-
86
-
87
-
88
-
89
-
90
-
 91
91 -
 92
92 -
 93
93 -
 94
94 -
 95
95 -
 96
96 -
 97
97 -
 98
98 -
 99
99 -
 100
100 -
 101
101 -
102
-
103
-
104
 |
 |
