Kenwood TS-480HX Operation Manual - Page 82
Operator Conveniences, Using Th-d7a As A Commander, Control Operation
 |
View all Kenwood TS-480HX manuals
Add to My Manuals
Save this manual to your list of manuals |
Page 82 highlights
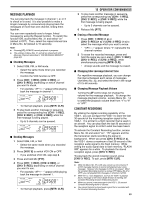
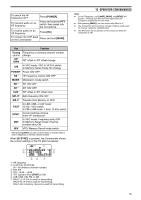
13 OPERATOR CONVENIENCES Mic Key Function 1 Power OFF 2 HF frequency receive ON/ OFF 3 Modulation mode switch 4 RIT ON/ OFF 5 XIT ON/ OFF 6 RIT offset or XIT offset clear 7 Split-frequency ON/ OFF 8 Transfer from Memory to VFO 9 In VFO mode: VFO A/ VFO B switch In Memory Recall mode: No change 0 Current settings retrieve (from HF transceiver) B VFO/ Memory Recall mode switch C XIT/ RIT offset frequency increase D XIT/ RIT offset frequency decrease In LSB, USB, or CW mode: 1 10 Hz/ 1 kHz switch In FM or AM mode: 1 kHz/ 10 kHz switch In VFO mode: Frequency entry ON # 2 In Memory Recall mode: Channel number entry ON 1 "FS" appears when you select 1 kHz step (LSB/ USB/ CW) or 10 kHz step (FM/ AM). 2 After pressing Mic [#], press Mic [0] to [9] to enter a frequency or memory channel number. When Mic [0] is pressed, the Commander shows the current settings of the HF transceiver: w q u e rt y q HF frequency w VFO: A, VFO: B, MR: 00 ~ 99 (memory channel number) e RIT, XIT r OFF, -9.99 ~ +9.99 t LSB, USB, CW, FM, or AM y SPLIT-A: VFO A is used for transmitting. SPLIT-B: VFO B is used for transmitting. SPLIT-M: A memory channel is used for transmitting. u "FS" appears when Mic [ ] is pressed. Note: ◆ After pressing [MENU], you can access only Menu 4-4. ◆ The Transporter will transmit its call sign in Morse code every 10 minutes, using the 144 MHz band. ◆ The APO timer will not operate on the transceiver while the Transporter is ON. USING TH-D7A AS A COMMANDER To use a TH-D7A transceiver as a "Commander" (an external remote control unit), follow the steps below. Basically, it is the same as using a TM-D700A as a "Commander" (described on the previous page). 74 TS-480 + TH-D7A/ TM-D700A (Transporter) Setup: 1 Configure the TH-D7A or TM-D700A as a "Transporter" and connect all the necessary cables to the TS-480 transceiver. 2 Select a frequency (HF/ 50 MHz band) on the TS-480 transceiver. 3 On the TS-480, press [MENU/ F.LOCK], then turn the MULTI control to access Menu No. 56. 4 Select the same communication parameters that you selected for the TH-D7A or TM-D700A transceiver. 5 Press [MENU/ F.LOCK] to complete. 6 Start the Transporter mode on the TH-D7A or TM-D700A transceiver. TH-D7A (Commander) Setup: 1 Access Menu 4-1 to enter the same callsign that you entered for the Commander (ex: WD6DJY). 2 Access Menu 4-2 to enter the same callsign that you entered for the Transporter (ex: WD6DJY-1). 3 Access Menu 4-3 to select the same CTCSS tone frequency that you selected for the Transporter. 4 Set the same frequencies that you selected for the "Transporter" for the VHF and UHF bands. Note: Refer to Chapter 19, Sky Command II, of the TH-D7A instruction manual for details on how to enter the callsign and CTCSS tone frequency. CONTROL OPERATION First, switch the TS-480 and TH-D7A or TM-D700A transceivers (Transporter) ON. Configure the TH-D7A or TM-D700A to enter the "Transporter" mode. Then, access Menu 4-4 on the TH-D7A and select "COMMANDER". "PUSH [0] KEY TO START COMMANDER!!" appears. Press [0] on the TH-D7A to start Sky Command II mode. When in Sky Command II mode, the keys of the TH-D7A (Commander) will function as described below. Only [LAMP], [MONI], and the VOL control functions will not change. Each time you press the desired key, the Commander will automatically enter Transmission mode and send the corresponding control command to the Transporter.
-
 1
1 -
2
-
3
-
4
-
5
-
6
-
7
-
8
-
9
-
10
-
11
-
12
-
13
-
14
-
15
-
16
-
17
-
18
-
19
-
20
-
21
-
22
-
23
-
24
-
25
-
26
-
27
-
28
-
29
-
30
-
31
-
32
-
33
-
34
-
35
-
36
-
37
-
38
-
39
-
40
-
41
-
42
-
43
-
44
-
45
-
46
-
47
-
48
-
49
-
50
-
51
-
52
-
53
-
54
-
55
-
56
-
57
-
58
-
59
-
60
-
61
-
62
-
63
-
64
-
65
-
66
-
67
-
68
-
69
-
70
-
71
-
72
-
73
-
74
-
75
-
76
-
 77
77 -
 78
78 -
 79
79 -
 80
80 -
 81
81 -
 82
82 -
 83
83 -
 84
84 -
 85
85 -
 86
86 -
 87
87 -
88
-
89
-
90
-
91
-
92
-
93
-
94
-
95
-
96
-
97
-
98
-
99
-
100
-
101
-
102
-
103
-
104
 |
 |
