Konica Minolta Kodak Ngenuity 9150 User Guide - Page 10
Exit tray, Tilted Forward, Appendix C, Installing and Using the Straight Pass-Through Adapter.
 |
View all Konica Minolta Kodak Ngenuity 9150 manuals
Add to My Manuals
Save this manual to your list of manuals |
Page 10 highlights
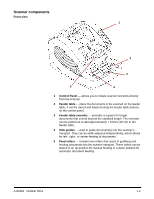
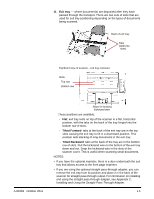
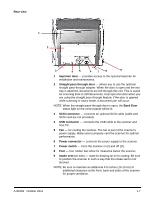
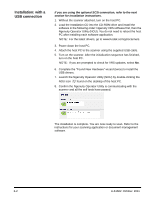
11 Exit tray - where document(s) are deposited after they have passed through the transport. There are two sets of slots that are used for exit tray positioning depending on the types of documents being scanned. Back of exit tray Tabs (slide into slots) Top/Front view of scanner - exit tray removed SlotsTop row Bottom row A-61662 October 2011 Stops for bracing kickstand wire These positions are available: - Flat: exit tray rests on top of the scanner in a flat, horizontal position, with the tabs on the back of the tray hinged into the bottom row of slots. - Tilted Forward: tabs at the back of the exit tray are in the top slots causing the exit tray to tilt in a downward position. This position aids stacking of long documents in the exit tray. - Tilted Backward: tabs at the back of the tray are in the bottom row of slots. Pull the kickstand wire on the bottom of the exit tray down and out. Snap the kickstand wire in the slots of the scanner cover. This is useful when scanning small documents. NOTES: • If you have the optional imprinter, there is a door underneath the exit tray that allows access to the front page imprinter. • If you are using the optional straight pass-through adapter, you can remove the exit tray from its position and place it in the back of the scanner for straight pass-through output. For information on installing and using the straight pass-through adapter, see Appendix C, Installing and Using the Straight Pass-Through Adapter. 1-5
-
 1
1 -
2
-
3
-
4
-
 5
5 -
 6
6 -
 7
7 -
 8
8 -
 9
9 -
 10
10 -
 11
11 -
 12
12 -
 13
13 -
 14
14 -
 15
15 -
16
-
17
-
18
-
19
-
20
-
21
-
22
-
23
-
24
-
25
-
26
-
27
-
28
-
29
-
30
-
31
-
32
-
33
-
34
-
35
-
36
-
37
-
38
-
39
-
40
-
41
-
42
-
43
-
44
-
45
-
46
-
47
-
48
-
49
-
50
-
51
-
52
-
53
-
54
-
55
-
56
-
57
-
58
-
59
-
60
-
61
-
62
-
63
-
64
-
65
-
66
-
67
-
68
-
69
-
70
-
71
-
72
-
73
-
74
-
75
-
76
-
77
-
78
-
79
-
80
-
81
-
82
-
83
-
84
-
85
-
86
-
87
-
88
-
89
-
90
-
91
-
92
-
93
-
94
-
95
-
96
-
97
-
98
 |
 |
