Konica Minolta Kodak Ngenuity 9150 User Guide - Page 13
Installation, Installing the exit deflector, Contents, Installing the exit, deflector
 |
View all Konica Minolta Kodak Ngenuity 9150 manuals
Add to My Manuals
Save this manual to your list of manuals |
Page 13 highlights
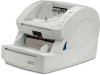
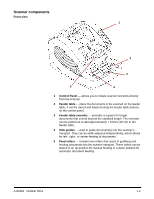
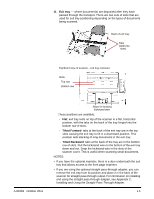
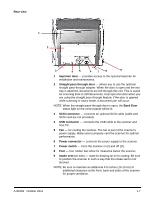
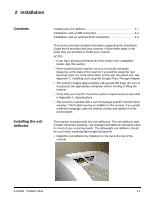
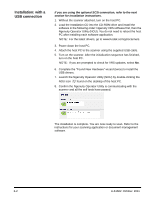
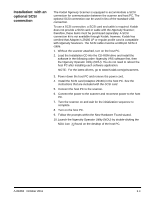
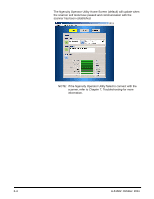
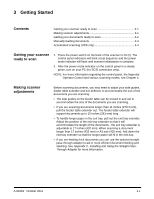
2 Installation Contents Installing the exit deflector Installing the exit deflector 2-1 Installation: with a USB connection 2-2 Installation: with an optional SCSI connection 2-3 This section provides detailed information supporting the Installation Guide that is provided with your scanner. Follow these steps in the order they are provided to install your scanner. NOTES: • If you have already performed all of the steps in the Installation Guide, skip this section. • When positioning the scanner, be sure to provide adequate clearance at the back of the scanner if you will be using the rear document exit. For more information on the rear document exit, see Appendix C, Installing and Using the Straight Pass-Through Adapter. • The scanner weighs approximately 112 pounds (50.8 kg). Be sure to incorporate the appropriate manpower before moving or lifting the scanner. • Verify that your host PC meets the system requirements as specified in Appendix A, Specifications. • The scanner is packed with a set of language-specific Control Panel overlays. The English overlay is installed on the scanner. If you prefer a different language, take the desired overlay and adhere it to the control panel. The scanner is packed with two exit deflectors. The exit deflector aids in better document stacking. The standard exit deflector should be used for most of your scanning needs. The lightweight exit deflector should be used when scanning light-weight documents. • Install the exit deflector by clipping it to the rail at the top of the scanner. A-61662 October 2011 2-1
-
 1
1 -
2
-
3
-
4
-
5
-
6
-
7
-
 8
8 -
 9
9 -
 10
10 -
 11
11 -
 12
12 -
 13
13 -
 14
14 -
 15
15 -
 16
16 -
 17
17 -
 18
18 -
19
-
20
-
21
-
22
-
23
-
24
-
25
-
26
-
27
-
28
-
29
-
30
-
31
-
32
-
33
-
34
-
35
-
36
-
37
-
38
-
39
-
40
-
41
-
42
-
43
-
44
-
45
-
46
-
47
-
48
-
49
-
50
-
51
-
52
-
53
-
54
-
55
-
56
-
57
-
58
-
59
-
60
-
61
-
62
-
63
-
64
-
65
-
66
-
67
-
68
-
69
-
70
-
71
-
72
-
73
-
74
-
75
-
76
-
77
-
78
-
79
-
80
-
81
-
82
-
83
-
84
-
85
-
86
-
87
-
88
-
89
-
90
-
91
-
92
-
93
-
94
-
95
-
96
-
97
-
98
 |
 |
