Konica Minolta Kodak Ngenuity 9150 User Guide - Page 80
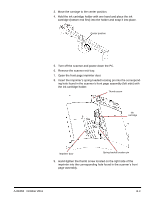
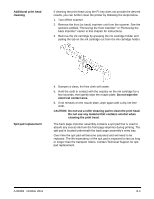
Removing the back imprinter, Unscrew the thumb screw located on the left side of the imprinter.
 |
View all Konica Minolta Kodak Ngenuity 9150 manuals
Add to My Manuals
Save this manual to your list of manuals |
Page 80 highlights
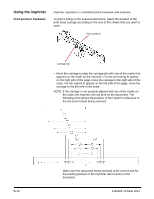
9. Connect the imprinter cable noting the orientation of the key on the plug and the slot on the connector. 10. Close the back page imprinter door. 11. Turn on the scanner and the PC. 12. Launch the Ngenuity Operator Utility and confirm the imprinter is recognized. NOTE: Do not leave the ink cartridge in the imprinter when not in use. Removing the back imprinter 1. Turn off the scanner. 2. Open the back page imprinter door. 3. Unplug the imprinter cable. 4. Unscrew the thumb screw located on the left side of the imprinter. 5. Pull the spring-loaded locating pin away from the wall of the scan- ner releasing the pin from the scanner's back page assembly. Locating pin 6. Pull the imprinter out of the scanner. 7. Close the back page imprinter door. 8. Turn on the scanner. B-6 A-61662 October 2011
-
 1
1 -
2
-
3
-
4
-
5
-
6
-
7
-
8
-
9
-
10
-
11
-
12
-
13
-
14
-
15
-
16
-
17
-
18
-
19
-
20
-
21
-
22
-
23
-
24
-
25
-
26
-
27
-
28
-
29
-
30
-
31
-
32
-
33
-
34
-
35
-
36
-
37
-
38
-
39
-
40
-
41
-
42
-
43
-
44
-
45
-
46
-
47
-
48
-
49
-
50
-
51
-
52
-
53
-
54
-
55
-
56
-
57
-
58
-
59
-
60
-
61
-
62
-
63
-
64
-
65
-
66
-
67
-
68
-
69
-
70
-
71
-
72
-
73
-
74
-
 75
75 -
 76
76 -
 77
77 -
 78
78 -
 79
79 -
 80
80 -
 81
81 -
 82
82 -
 83
83 -
 84
84 -
 85
85 -
86
-
87
-
88
-
89
-
90
-
91
-
92
-
93
-
94
-
95
-
96
-
97
-
98
 |
 |
