Konica Minolta Kodak Ngenuity 9150 User Guide - Page 12
Rear view, power supply. Make sure to properly vent the scanner for optimal
 |
View all Konica Minolta Kodak Ngenuity 9150 manuals
Add to My Manuals
Save this manual to your list of manuals |
Page 12 highlights
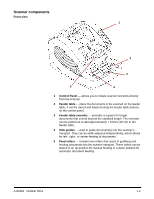
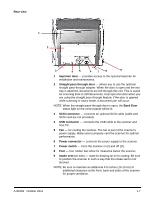
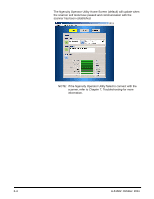
Rear view 1 2 3 45 67 8 9 1 Imprinter door - provides access to the optional imprinter for installation and maintenance. 2 Straight pass-through door - allows you to use the optional straight pass-through adapter. When the door is open and the exit tray is attached, documents are fed through this exit. This is useful for scanning thick or stiff documents. Only open this door when you are using the straight pass-through feature, if the door is opened while scanning in rotary mode, a document jam will occur. NOTE: When the straight pass-through door is open, the Back Door status light on the control panel will be lit. 3 SCSI connector - connects an optional SCSI cable (cable and SCSI card are not provided). 4 USB connector - connects the USB cable to the scanner and host PC. 5 Fan - for cooling the scanner. The fan is part of the scanner's power supply. Make sure to properly vent the scanner for optimal performance. 6 Power connector - connects the power supply to the scanner. 7 Power switch - turns the scanner on (I) and off (O). 8 Foot - four rubber feet allow for clearance below the scanner. 9 Intake vent (on side) - used for drawing air in for cooling. Be sure to position the scanner in such a way that the intake vent is not blocked. NOTE: Be sure to maintain an additional 4-5 inches (10-13 cm) of additional clearance at the front, back and sides of the scanner for proper ventilation. A-61662 October 2011 1-7
-
 1
1 -
2
-
3
-
4
-
5
-
6
-
 7
7 -
 8
8 -
 9
9 -
 10
10 -
 11
11 -
 12
12 -
 13
13 -
 14
14 -
 15
15 -
 16
16 -
 17
17 -
18
-
19
-
20
-
21
-
22
-
23
-
24
-
25
-
26
-
27
-
28
-
29
-
30
-
31
-
32
-
33
-
34
-
35
-
36
-
37
-
38
-
39
-
40
-
41
-
42
-
43
-
44
-
45
-
46
-
47
-
48
-
49
-
50
-
51
-
52
-
53
-
54
-
55
-
56
-
57
-
58
-
59
-
60
-
61
-
62
-
63
-
64
-
65
-
66
-
67
-
68
-
69
-
70
-
71
-
72
-
73
-
74
-
75
-
76
-
77
-
78
-
79
-
80
-
81
-
82
-
83
-
84
-
85
-
86
-
87
-
88
-
89
-
90
-
91
-
92
-
93
-
94
-
95
-
96
-
97
-
98
 |
 |
