Konica Minolta Kodak Ngenuity 9150 User Guide - Page 88
Front Annotation/Back Annotation, Imprinter/Annotation Position
 |
View all Konica Minolta Kodak Ngenuity 9150 manuals
Add to My Manuals
Save this manual to your list of manuals |
Page 88 highlights
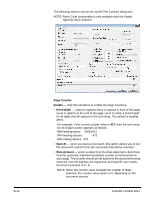
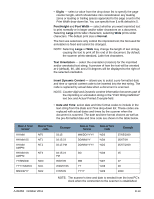
B-14 Special Content - select special content format codes to include in the text string from the drop-down list. These codes are replaced with actual symbols or text by the scanner when the document is scanned. The special content format choices and pre-formatted special content codes are shown in the table below. Special Content Euro Symbol Yen Symbol Scanner ID Code %A0128 %A0165 %S0 Example € ¥ 12345678 Annotation Position - allows you to specify the horizontal location for annotating. • Offset from Left: specify the distance of an annotation string from the left edge of a page. The minimum value is 0 (default) and the maximum value is dependent on the resulting image size. You must enter whole numbers for pixels and millimeters, but you can enter decimal numbers in 0.1-inch increments for inches. This option is only available if Front and/or Back Annotation is selected. • Front Annotation/Back Annotation: annotation can be performed on the front, back, or both sides of a document and is enabled using the Front Annotation and Back Annotation check boxes. To specify the position of annotation text on a document: 1. In the Units group, select a unit of measurement for the offset. 2. In the Offset from Top text box, specify the distance from the top edge of the page the annotation string should appear. (This value also controls the mechanical imprinter text offset.) 3. Select where you want the annotation: Front, Back or Front and Back. 4. In the Offset from Left text box, specify the distance from the left edge of the page the annotation string should appear. 5. Click OK when finished. NOTE: Because this measurement affects where the annotation is added to the actual image, be sure to select an offset measurement that remains within the length and width of the image. Units - use the options in the Units group to specify text positioning values in inches, millimeters, or pixels (dpi dependent). The default unit of measurement is inches. Imprinter/Annotation Position - the Imprinter / Annotation Position settings are all offsets from the top in this frame. The same Offset from the top value applies to both the physical imprinter and the electronic annotation. A-61662 October 2011
-
 1
1 -
2
-
3
-
4
-
5
-
6
-
7
-
8
-
9
-
10
-
11
-
12
-
13
-
14
-
15
-
16
-
17
-
18
-
19
-
20
-
21
-
22
-
23
-
24
-
25
-
26
-
27
-
28
-
29
-
30
-
31
-
32
-
33
-
34
-
35
-
36
-
37
-
38
-
39
-
40
-
41
-
42
-
43
-
44
-
45
-
46
-
47
-
48
-
49
-
50
-
51
-
52
-
53
-
54
-
55
-
56
-
57
-
58
-
59
-
60
-
61
-
62
-
63
-
64
-
65
-
66
-
67
-
68
-
69
-
70
-
71
-
72
-
73
-
74
-
75
-
76
-
77
-
78
-
79
-
80
-
81
-
82
-
 83
83 -
 84
84 -
 85
85 -
 86
86 -
 87
87 -
 88
88 -
 89
89 -
 90
90 -
 91
91 -
 92
92 -
 93
93 -
94
-
95
-
96
-
97
-
98
 |
 |
