Konica Minolta Kodak Ngenuity 9150 User Guide - Page 66
Camera calibration, NOU Home screen.
 |
View all Konica Minolta Kodak Ngenuity 9150 manuals
Add to My Manuals
Save this manual to your list of manuals |
Page 66 highlights
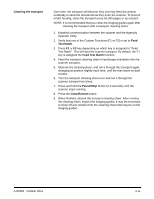
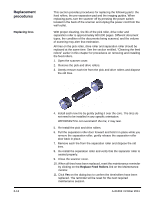
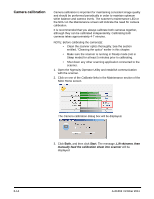
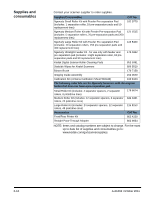
Camera calibration Camera calibration is important for maintaining consistent image quality and should be performed periodically in order to maintain optimum white balance and camera levels. The scanner's maintenance LED or the NOU on the Maintenance screen will indicate the need for camera calibration. It is recommended that you always calibrate both cameras together, although they can be calibrated independently. Calibrating both cameras takes approximately 4-7 minutes. NOTE: Before calibrating the camera(s): • Clean the scanner optics thoroughly. See the section entitled, "Cleaning the optics" earlier in this chapter. • Make sure the scanner is running in Ready mode (not in Sleep mode) for at least 5 minutes prior to calibrating. • Shut down any other scanning application connected to the scanner. 1. Open the Ngenuity Operator Utility and establish communication with the scanner. 2. Click on one of the Calibrate links in the Maintenance section of the NOU Home screen. The Camera calibration dialog box will be displayed. 3. Click Both, and then click Start. The message, Lift skimmer, then manually feed the calibration sheet into scanner will be displayed. 6-14 A-61662 October 2011
-
 1
1 -
2
-
3
-
4
-
5
-
6
-
7
-
8
-
9
-
10
-
11
-
12
-
13
-
14
-
15
-
16
-
17
-
18
-
19
-
20
-
21
-
22
-
23
-
24
-
25
-
26
-
27
-
28
-
29
-
30
-
31
-
32
-
33
-
34
-
35
-
36
-
37
-
38
-
39
-
40
-
41
-
42
-
43
-
44
-
45
-
46
-
47
-
48
-
49
-
50
-
51
-
52
-
53
-
54
-
55
-
56
-
57
-
58
-
59
-
60
-
 61
61 -
 62
62 -
 63
63 -
 64
64 -
 65
65 -
 66
66 -
 67
67 -
 68
68 -
 69
69 -
 70
70 -
 71
71 -
72
-
73
-
74
-
75
-
76
-
77
-
78
-
79
-
80
-
81
-
82
-
83
-
84
-
85
-
86
-
87
-
88
-
89
-
90
-
91
-
92
-
93
-
94
-
95
-
96
-
97
-
98
 |
 |
