Konica Minolta bizhub PRO 1100 bizhub PRO 1100 Quick Guide - Page 105
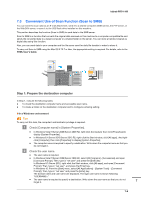
Step 2: Connect this machine to the network
 |
View all Konica Minolta bizhub PRO 1100 manuals
Add to My Manuals
Save this manual to your list of manuals |
Page 105 highlights
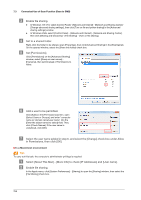
bizhub PRO 1100 $ Enable the SMB-base sharing. Click [Options] on the [Sharing] window, select the [Share files and folders using SMB (Windows)] check box, then select the check box of the login user name (displayed name). % Set to a shared folder. Click [+] on the [Sharing] window, select a folder to be shared, then click [Add]. Then, check that the user name and access rights of the folder are set to the [Read & Write] mode. Step 2: Connect this machine to the network To connect this machine to the network, check that: - The LAN cable is connected. - The IP address is assigned to this machine. Reference To configure the network settings, select Utility/Counter - [Administrator Setting] - [Network Setting] - [NIC Setting]. For details, refer to the HTML User's Guide. For information about the default administrator password, refer to page 6-15. Step 3: Prepare the operating environment for SMB transmission Enable the SMB transmission function. - Set [SMB Send Setting] of this machine to [Enable]. (In general use, you do not need to change the default setting.) - In Mac OS X 10.7 or later, the following settings are required. - NTLM Setting The NTLM setting is only available for v2. Specify items including NTLM v2. - Date/Time Setting Specify the date and time of this machine and computer, including the time zone. Reference For details about various settings, refer to the HTML User's Guide. Step 4: Configure settings according to your environment Register destinations that are frequently used. - This can reduce the number of steps required to manually enter destinations. - Select the [SCAN] screen of this machine to register the SMB server setting. - You can also use the [Scan Address Register] on the [UTILITY] screen to register the setting. Reference For details about how to register destinations, refer to the HTML User's Guide. Step 5: Send scan data to a public folder Send scan data to a public folder of the registered SMB server. In the [SCAN] screen of this machine, select an SMB destination, configure the scan conditions, then press Start. Reference You can specify conditions such as the image quality and scanning size. For details about scan conditions, refer to the HTML User's Guide. 7 7-10
-
 1
1 -
2
-
3
-
4
-
5
-
6
-
7
-
8
-
9
-
10
-
11
-
12
-
13
-
14
-
15
-
16
-
17
-
18
-
19
-
20
-
21
-
22
-
23
-
24
-
25
-
26
-
27
-
28
-
29
-
30
-
31
-
32
-
33
-
34
-
35
-
36
-
37
-
38
-
39
-
40
-
41
-
42
-
43
-
44
-
45
-
46
-
47
-
48
-
49
-
50
-
51
-
52
-
53
-
54
-
55
-
56
-
57
-
58
-
59
-
60
-
61
-
62
-
63
-
64
-
65
-
66
-
67
-
68
-
69
-
70
-
71
-
72
-
73
-
74
-
75
-
76
-
77
-
78
-
79
-
80
-
81
-
82
-
83
-
84
-
85
-
86
-
87
-
88
-
89
-
90
-
91
-
92
-
93
-
94
-
95
-
96
-
97
-
98
-
99
-
 100
100 -
 101
101 -
 102
102 -
 103
103 -
 104
104 -
 105
105 -
 106
106 -
 107
107 -
 108
108 -
 109
109 -
 110
110 -
111
-
112
-
113
-
114
-
115
-
116
-
117
-
118
-
119
 |
 |