Kyocera ECOSYS FS-1120D DRIVER DOWNLOAD Kyocera Command Center RX User Guide R - Page 90
Message Board, Settings, Adding a Message List
 |
View all Kyocera ECOSYS FS-1120D DRIVER DOWNLOAD manuals
Add to My Manuals
Save this manual to your list of manuals |
Page 90 highlights
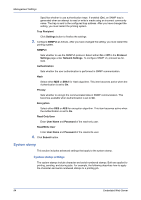
Management Settings Bold: Select either On or Off. Italic: Select either On or Off. Color: Select the color for the text from the drop-down list. Display Pattern: From the drop-down list, select Transparent, Clipping, or Overwrite. Density: Select the transparency of the character stamp, from the drop-down list. The less the value, the more the stamp becomes transparent. 3. Click Submit button. To cancel settings, click Back button. Stamp Default Settings 1. Click System Stamp under Management Settings on the navigation menu. The System Stamp Settings page opens. 2. To change the stamp default settings, click Settings button in Default Settings. 1. Text Stamp: Add or delete the text stamp as follows. Text 1 (to 10): Enter the text for text stamp. To remove the text stamp, delete the text in Text 1 (to 10). 2. Font Size: Enter the following font size. Page #: Enter Font Size 1 (to 3) for page number in range of 6.0 to 64.0 pt as necessary. Text Stamp: Enter Font Size 1 (to 3) for text stamp in range of 6.0 to 64.0 pt as necessary. Bates Stamp: Enter Font Size 1 (to 3) for bates stamp in range of 6.0 to 64.0 pt as necessary. 3. Click Submit button. To cancel settings, click Back button. Message Board This section provides information on how to configure the message board that is shown on the machine's operation panel of the embedded web server. Settings To enable the message board, you must first make settings for the message board. 1. Click Message Board under Management Settings on the navigation menu. The Settings page opens. 2. Click Settings button. 3. To enable the message board, select On and click Submit button. To cancel settings, click Back button. Adding a Message List 1. Click Add icon. The New Message - Property page opens. 2. You can configure settings for property. This section includes the following items for configuration: Device to Show Add Operation Panel and/or Command Center RX. Place to Show 86 Embedded Web Server
-
 1
1 -
2
-
3
-
4
-
5
-
6
-
7
-
8
-
9
-
10
-
11
-
12
-
13
-
14
-
15
-
16
-
17
-
18
-
19
-
20
-
21
-
22
-
23
-
24
-
25
-
26
-
27
-
28
-
29
-
30
-
31
-
32
-
33
-
34
-
35
-
36
-
37
-
38
-
39
-
40
-
41
-
42
-
43
-
44
-
45
-
46
-
47
-
48
-
49
-
50
-
51
-
52
-
53
-
54
-
55
-
56
-
57
-
58
-
59
-
60
-
61
-
62
-
63
-
64
-
65
-
66
-
67
-
68
-
69
-
70
-
71
-
72
-
73
-
74
-
75
-
76
-
77
-
78
-
79
-
80
-
81
-
82
-
83
-
84
-
 85
85 -
 86
86 -
 87
87 -
 88
88 -
 89
89 -
 90
90 -
 91
91 -
 92
92 -
 93
93 -
 94
94 -
 95
95 -
96
-
97
-
98
 |
 |
