Kyocera KM-5230 Printing System J Instruction Handbook - Page 16
Printer default settings, Accessing the printer default screen, Auto continue, Receive buffer
 |
View all Kyocera KM-5230 manuals
Add to My Manuals
Save this manual to your list of manuals |
Page 16 highlights
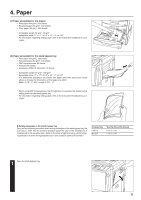
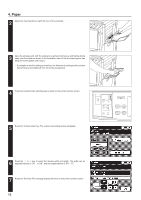
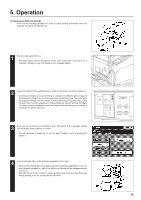
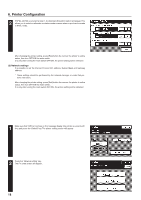
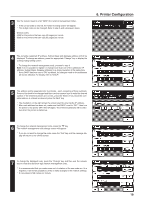
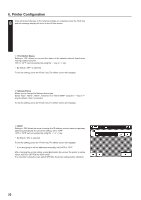
6. Printer Configuration (2) Printer default settings Carry out the following procedure to change the default settings for the Auto continue, Receive buffer and Time out functions that are in effect when this unit is used as a printer. After changing the printer setting, press [End] button the recover the printer to online status, then turn OFF/ON the main switch. It is only after turning the main switch OFF/ON, the printer setting will be reflected. 1 G Accessing the printer default screen Make sure that "Off line" is shown in the message display (the printer is currently offline) and press the "Default" key. The printer setting screen will appear. 2 Press the "Printer default" key. The printer default screen will appear. * To return all of the functions to their initial default settings, press the "Restore Defaults" key. * Once all desired changes to the default settings are complete, press the "End" key and the message display will return to the printer setting screen. 1 Auto continue If a printer error such as a paper mismatch error occurs, printing can be set to restart automatically after the amount of time specified here. In this case, the print job will NOT be stopped. If, however, "OFF" is selected here, the print job WILL be stopped whenever a printing error occurs. If "0 Min" is selected, the error will be ignored and printing will continue. Press the "-" or "+" key to select either "0 Min", "2 Min", "5 Min", "10 Min", "20 Min" or "OFF". * The factory default setting is "2 Min". 2 Receive buffer The receive buffer function allows you to set the amount of system memory allocated for data received from the I/F Board to be spooled before it is printed. Setting the buffer to a larger value allows more data to be received from the computer, thereby reducing the amount of computer down time during printing. Press the "-" or "+" key to select either "24 KB", "500 KB", "700 KB" or "990 KB". * The factory default setting is "500 KB". 16
-
 1
1 -
2
-
3
-
4
-
5
-
6
-
7
-
8
-
9
-
10
-
 11
11 -
 12
12 -
 13
13 -
 14
14 -
 15
15 -
 16
16 -
 17
17 -
 18
18 -
 19
19 -
 20
20 -
 21
21 -
22
-
23
-
24
-
25
-
26
-
27
-
28
-
29
-
30
-
31
-
32
-
33
-
34
-
35
-
36
-
37
-
38
-
39
-
40
-
41
-
42
-
43
-
44
-
45
-
46
-
47
-
48
-
49
-
50
-
51
-
52
-
53
-
54
-
55
-
56
-
57
-
58
-
59
-
60
-
61
-
62
-
63
-
64
-
65
-
66
-
67
-
68
 |
 |
