Kyocera KM-5230 Printing System J Instruction Handbook - Page 19
keys to enter the desired 4-digit network management code.
 |
View all Kyocera KM-5230 manuals
Add to My Manuals
Save this manual to your list of manuals |
Page 19 highlights
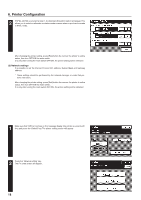
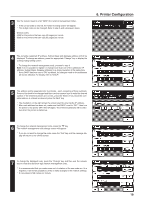
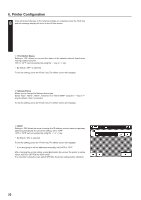
3 Use the numeric keys to enter "4200" (the network management code). * If the correct code is entered, the network setting screen will appear. * This 4-digit code can be changed. Refer to step 6 and subsequent steps. Default codes: 4200 for the printers that can copy 42 pages per minute 5200 for the printers that can copy 52 pages per minute 6. Printer Configuration 4 The currently registered IP address, Subnet Mask and Gateway address will all be displayed. To change an address, press the appropriate "Change" key to display the corresponding setting screen. * To change the network management code, proceed to step 6. Note: It is not possible to register or change more than one of the addresses (IP address, Subnet Mask, Gateway address) by a single operation at the same time. * Since DHCP has been set to "ON" by default, the changes made to the addresses will not be effective. For details, refer to "DHCP". 5 The address will be separated into four blocks - each consisting of three numbers. Press on the block to be changed and then use the numeric keys to enter the desired number. If the entered numbers are correct, press the "Enter #" key. Once the complete address is entered as desired, press the "End" key. * The illustration on the right shows the screen used for entering the IP address. * After each address has been set, make sure that DHCP is set to "OFF", then turn the power to the printer OFF, then ON again. The entered addresses will be effective when the printer is started up. 6 To change the network management code, press the "M" key. The network management code change screen will appear. * If you do not want to change the code, press the "End" key and the message display will return to the off-line screen. 7 To change the displayed code, press the "Change" key and then use the numeric keys to enter the desired 4-digit network management code. * It is recommended that you make some sort of notation of the new code as, if it is forgotten, it will not be possible to verify or make changes to the network settings. * A copy speed of 42 copies per minute. 19
-
 1
1 -
2
-
3
-
4
-
5
-
6
-
7
-
8
-
9
-
10
-
11
-
12
-
13
-
 14
14 -
 15
15 -
 16
16 -
 17
17 -
 18
18 -
 19
19 -
 20
20 -
 21
21 -
 22
22 -
 23
23 -
 24
24 -
25
-
26
-
27
-
28
-
29
-
30
-
31
-
32
-
33
-
34
-
35
-
36
-
37
-
38
-
39
-
40
-
41
-
42
-
43
-
44
-
45
-
46
-
47
-
48
-
49
-
50
-
51
-
52
-
53
-
54
-
55
-
56
-
57
-
58
-
59
-
60
-
61
-
62
-
63
-
64
-
65
-
66
-
67
-
68
 |
 |
