LG HCS5650 Operation Guide - Page 26
Clock Setup Continued
 |
View all LG HCS5650 manuals
Add to My Manuals
Save this manual to your list of manuals |
Page 26 highlights
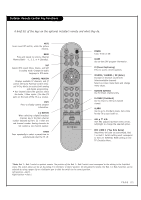
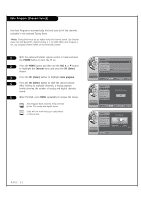
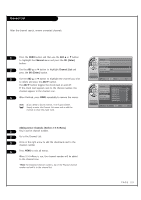
Clock Setup (Continued) Manual Time Settings - Use the ADJ D E F G buttons to set the year, month, day, hours and minutes. 1 Press the MENU button and then use the ADJ D or E button to highlight the Setup menu and press the OK (Enter) button. 2 Use the ADJ D or E button to highlight Time. 3 Press the OK (Enter) button to highlight Clock. Manual or Auto will appear on the menu next to clock. If manual is selected, on the menu use the ADJ D or E button to highlight Manual and press the OK (Enter) button. 4 Use the ADJ D or E button to highlight Manual Clock and press the OK (Enter)button. 5 Use the ADJ D E F G buttons to set the year, month, day, AM/PM, hours and minutes. 6 When finished, press MENU repeatedly to remove the menus. On-Off Timers Setup Set the On-Off Timers using the procedures described above. *Notes: If you intend to use the On-Off Timers, it is best to set the clock manually. PAGE 26 Time G V-Chip Menu Language English Menu Transparency Semi Opaque Set ID 1 D E Move OK Select MENU Back Clock Manual Manual Clock Daylight Saving Time Zone On Timer Off Timer Auto Off Off D E Move OK Select G MENU Back Clock Manual Clock Daylight Saving Time Zone On Timer Off Timer Auto Off Auto Manual D E Select MENU Back Clock Manual Manual Clock Daylight Saving Time Zone On Timer Off Timer Auto Off Off D E Move OK Select G MENU Back Clock Manual Clock Daylight Saving Time Zone On Timer Off Timer Auto Off D E Adjust F G Move MENU Back
-
 1
1 -
2
-
3
-
4
-
5
-
6
-
7
-
8
-
9
-
10
-
11
-
12
-
13
-
14
-
15
-
16
-
17
-
18
-
19
-
20
-
 21
21 -
 22
22 -
 23
23 -
 24
24 -
 25
25 -
 26
26 -
 27
27 -
 28
28 -
 29
29 -
 30
30 -
 31
31 -
32
-
33
-
34
-
35
-
36
-
37
-
38
-
39
-
40
-
41
-
42
-
43
-
44
-
45
-
46
-
47
-
48
-
49
-
50
-
51
-
52
-
53
-
54
-
55
-
56
-
57
-
58
-
59
-
60
-
61
-
62
-
63
-
64
-
65
-
66
-
67
-
68
-
69
-
70
-
71
-
72
-
73
-
74
-
75
-
76
-
77
-
78
-
79
-
80
 |
 |
