Lexmark C772N C77x - Setup Guide - Page 24
Replacing the shield
 |
UPC - 734646047227
View all Lexmark C772N manuals
Add to My Manuals
Save this manual to your list of manuals |
Page 24 highlights
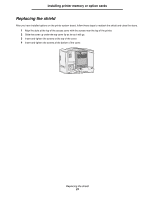
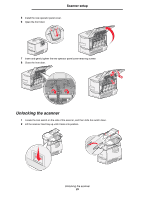
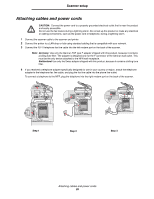
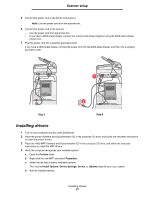
Installing printer memory or option cards Replacing the shield After you have installed options on the printer system board, follow these steps to reattach the shield and close the doors. 1 Align the slots at the top of the access cover with the screws near the top of the printer. 2 Slide the cover up under the top cover lip as far as it will go. 3 Insert and tighten the screws at the top of the cover. 4 Insert and tighten the screws at the bottom of the cover. Replacing the shield 23
-
 1
1 -
2
-
3
-
4
-
5
-
6
-
7
-
8
-
9
-
10
-
11
-
12
-
13
-
14
-
15
-
16
-
17
-
18
-
 19
19 -
 20
20 -
 21
21 -
 22
22 -
 23
23 -
 24
24 -
 25
25 -
 26
26 -
 27
27 -
 28
28 -
 29
29 -
30
-
31
-
32
-
33
-
34
-
35
 |
 |

Replacing the shield
23
Installing printer memory or option cards
Replacing the shield
After you have installed options on the printer system board, follow these steps to reattach the shield and close the doors.
1
Align the slots at the top of the access cover with the screws near the top of the printer.
2
Slide the cover up under the top cover lip as far as it will go.
3
Insert and tighten the screws at the top of the cover.
4
Insert and tighten the screws at the bottom of the cover.