Lexmark X342N User's Guide - Page 17
Learning about the MFP, Understanding the parts of the MFP - scanner
 |
UPC - 734646256292
View all Lexmark X342N manuals
Add to My Manuals
Save this manual to your list of manuals |
Page 17 highlights
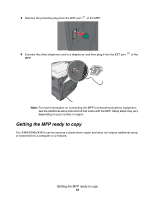
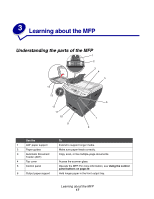
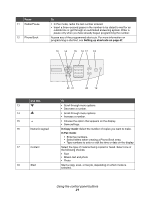
3 Learning about the MFP Understanding the parts of the MFP 1 2 3 4 5 14 13 12 11 10 9 6 7 8 Use the 1 ADF paper support 2 Paper guides 3 Automatic Document Feeder (ADF) 4 Top cover 5 Control panel 6 Output paper support To Extend to support longer media. Make sure paper feeds correctly. Copy, scan, or fax multiple-page documents. Access the scanner glass. Operate the MFP. For more information, see Using the control panel buttons on page 20. Hold longer paper in the front output tray. Learning about the MFP 17
-
 1
1 -
2
-
3
-
4
-
5
-
6
-
7
-
8
-
9
-
10
-
11
-
 12
12 -
 13
13 -
 14
14 -
 15
15 -
 16
16 -
 17
17 -
 18
18 -
 19
19 -
 20
20 -
 21
21 -
 22
22 -
23
-
24
-
25
-
26
-
27
-
28
-
29
-
30
-
31
-
32
-
33
-
34
-
35
-
36
-
37
-
38
-
39
-
40
-
41
-
42
-
43
-
44
-
45
-
46
-
47
-
48
-
49
-
50
-
51
-
52
-
53
-
54
-
55
-
56
-
57
-
58
-
59
-
60
-
61
-
62
-
63
-
64
-
65
-
66
-
67
-
68
-
69
-
70
-
71
-
72
-
73
-
74
-
75
-
76
-
77
-
78
-
79
-
80
-
81
-
82
-
83
-
84
-
85
-
86
-
87
-
88
-
89
-
90
-
91
-
92
-
93
-
94
-
95
-
96
-
97
-
98
-
99
-
100
-
101
-
102
-
103
-
104
-
105
 |
 |
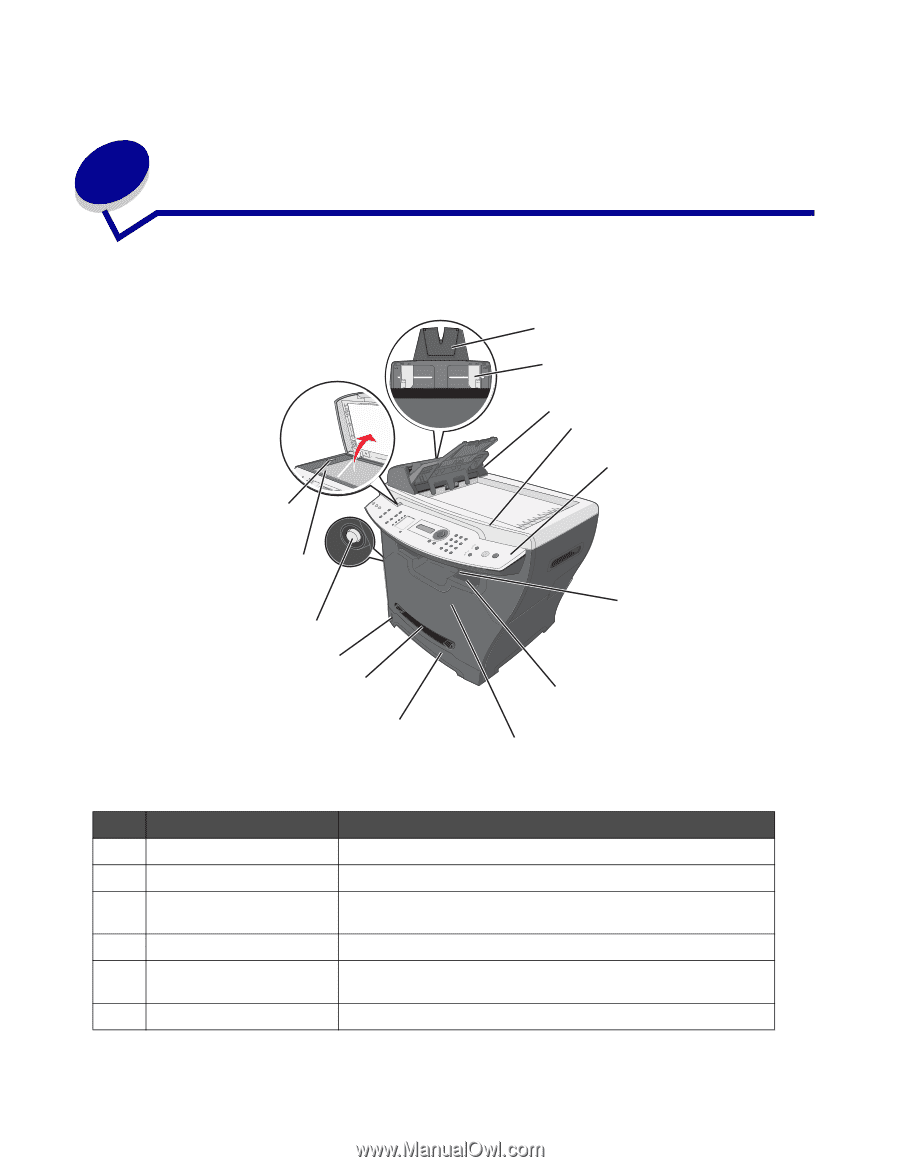
Learning about the MFP
17
3
Learning about the MFP
Understanding the parts of the MFP
Use the
To
1
ADF paper support
Extend to support longer media.
2
Paper guides
Make sure paper feeds correctly.
3
Automatic Document
Feeder (ADF)
Copy, scan, or fax multiple–page documents.
4
Top cover
Access the scanner glass.
5
Control panel
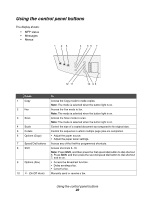
Operate the MFP. For more information, see
Using the control
panel buttons on page 20
.
6
Output paper support
Hold longer paper in the front output tray.
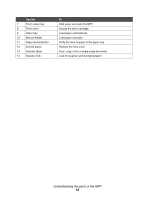
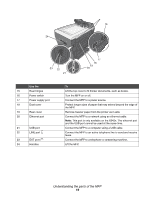
4
8
9
10
13
5
6
11
12
14
7
2
1
3