Linksys BEFSR11 User Guide - Page 24
Network and Internet Connections - default ip address
 |
UPC - 745883549405
View all Linksys BEFSR11 manuals
Add to My Manuals
Save this manual to your list of manuals |
Page 24 highlights
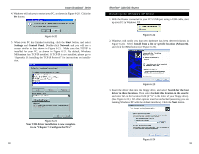
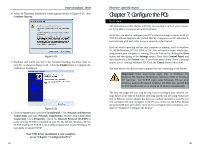
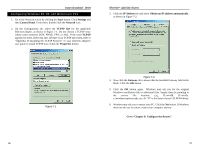
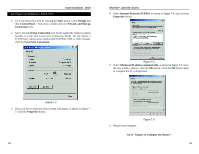
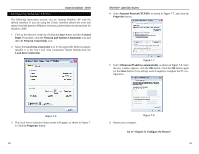
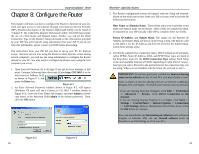
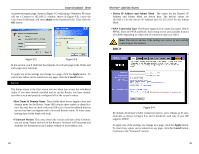
Instant Broadband™ Series Configuring Windows XP PCs The following instructions assume you are running Windows XP with the default interface. If you are using the Classic interface (where the icons and menus look like previous Windows versions), please follow the instructions for Windows 2000. 1. Click to the Network screen by clicking the Start button and then Control Panel. From there, click the Network and Internet Connections icon and then the Network Connections icon. 2. Select the Local Area Connection icon for the applicable Ethernet adapter (usually it is the first Local Area Connection listed). Double-click the Local Area Connection. EtherFast® Cable/DSL Routers 4. Select Internet Protocol (TCP/IP), as shown in Figure 7-7, and click the Properties button. Figure 7-7 5. Select Obtain an IP address automatically, as shown in Figure 7-8. Once the new window appears, click the OK button. Click the OK button again (or the Close button if any settings were changed) to complete the PC configuration. Figure 7-6 3. The Local Area Connection Status screen will appear, as shown in Figure 76. Click the Properties button. 6. Restart your computer. Figure 7-8 Go to "Chapter 8: Configure the Router." 40 41
-
 1
1 -
2
-
3
-
4
-
5
-
6
-
7
-
8
-
9
-
10
-
11
-
12
-
13
-
14
-
15
-
16
-
17
-
18
-
 19
19 -
 20
20 -
 21
21 -
 22
22 -
 23
23 -
 24
24 -
 25
25 -
 26
26 -
 27
27 -
 28
28 -
 29
29 -
30
-
31
-
32
-
33
-
34
-
35
-
36
-
37
-
38
-
39
-
40
-
41
-
42
-
43
-
44
-
45
-
46
-
47
-
48
-
49
-
50
-
51
-
52
-
53
-
54
-
55
-
56
-
57
-
58
-
59
-
60
-
61
-
62
-
63
-
64
-
65
-
66
 |
 |
