Linksys BEFSR11 User Guide - Page 58
Appendix D: Installing the TCP/IP, Protocol
 |
UPC - 745883549405
View all Linksys BEFSR11 manuals
Add to My Manuals
Save this manual to your list of manuals |
Page 58 highlights
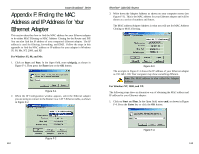
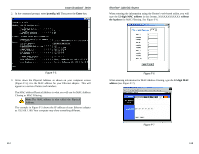
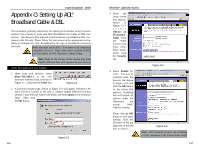
Instant Broadband™ Series Appendix D: Installing the TCP/IP Protocol Follow these instructions to install the TCP/IP protocol on one of your PCs only after a network card has been successfully installed inside the PC. These instructions are for Windows 95, Windows 98, and Windows Me. For TCP/IP setup under Windows NT, 2000, and XP, see your Windows documentation or the Help feature. 1. Click the Start button. Choose Settings and then Control Panel. 2. Double-click on the Network icon to bring up your Network window. Select the Configuration tab, as shown in Figure D-1. EtherFast® Cable/DSL Routers 6. Find and double-click TCP/IP in the list to the right (see Figure D-2). Figure D-2 7. After a few seconds, the main Network window will appear. The TCP/IP Protocol should now be listed, as shown in Figure D-3. 3. Click the Add button. Figure D-1 4. Double-click on Protocol. 5. Highlight Microsoft under the list of manufacturers. 108 Figure D-3 8. Click the OK button. Windows may ask for original Windows installation files. Supply them as needed, e.g., c:\windows\options\cabs, D:\win98, D:\win95. 9. Windows will ask you to restart the PC. Click the Yes button. The TCP/IP installation is now complete. 109
-
 1
1 -
2
-
3
-
4
-
5
-
6
-
7
-
8
-
9
-
10
-
11
-
12
-
13
-
14
-
15
-
16
-
17
-
18
-
19
-
20
-
21
-
22
-
23
-
24
-
25
-
26
-
27
-
28
-
29
-
30
-
31
-
32
-
33
-
34
-
35
-
36
-
37
-
38
-
39
-
40
-
41
-
42
-
43
-
44
-
45
-
46
-
47
-
48
-
49
-
50
-
51
-
52
-
 53
53 -
 54
54 -
 55
55 -
 56
56 -
 57
57 -
 58
58 -
 59
59 -
 60
60 -
 61
61 -
 62
62 -
 63
63 -
64
-
65
-
66
 |
 |
