Lowrance HDS-7 LIVE HDS Live Operator Manual - Page 67
Viewing history, Recording log data
 |
View all Lowrance HDS-7 LIVE manuals
Add to My Manuals
Save this manual to your list of manuals |
Page 67 highlights
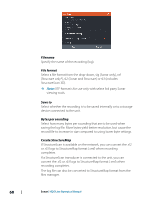
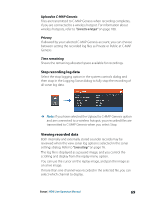
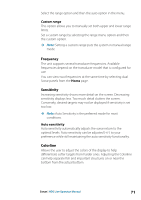
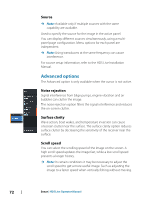
3. Position the cursor on the second measuring point - A line is drawn between the measuring points, and the distance listed in the Cursor Information window 4. Continue selecting new measuring points if required Use menu options to re-position the start point and the end point as long as the measuring function is active. Select the finish measuring menu option or press the exit key to resume normal image scrolling. Viewing history You can view sonar history by panning the image. You can also use the preview feature to pan history, refer to "Preview" on page 75. To resume normal scrolling, select Clear cursor or press the exit key. Recording log data Start recording log data You can start recording log data and save the file internally in the unit, or save it onto a storage device connected to the unit. The Log sonar dialog is activated from the System Controls dialog, or from the Sonar Settings dialog. When the data is being recorded, there is a flashing red symbol in the top left corner and a message appears periodically at the bottom of the screen. When you select to start recording, the record sonar log dialog is displayed where you specify recording settings. Sonar | HDS Live Operator Manual 67
-
 1
1 -
2
-
3
-
4
-
5
-
6
-
7
-
8
-
9
-
10
-
11
-
12
-
13
-
14
-
15
-
16
-
17
-
18
-
19
-
20
-
21
-
22
-
23
-
24
-
25
-
26
-
27
-
28
-
29
-
30
-
31
-
32
-
33
-
34
-
35
-
36
-
37
-
38
-
39
-
40
-
41
-
42
-
43
-
44
-
45
-
46
-
47
-
48
-
49
-
50
-
51
-
52
-
53
-
54
-
55
-
56
-
57
-
58
-
59
-
60
-
61
-
 62
62 -
 63
63 -
 64
64 -
 65
65 -
 66
66 -
 67
67 -
 68
68 -
 69
69 -
 70
70 -
 71
71 -
 72
72 -
73
-
74
-
75
-
76
-
77
-
78
-
79
-
80
-
81
-
82
-
83
-
84
-
85
-
86
-
87
-
88
-
89
-
90
-
91
-
92
-
93
-
94
-
95
-
96
-
97
-
98
-
99
-
100
-
101
-
102
-
103
-
104
-
105
-
106
-
107
-
108
-
109
-
110
-
111
-
112
-
113
-
114
-
115
-
116
-
117
-
118
-
119
-
120
-
121
-
122
-
123
-
124
-
125
-
126
-
127
-
128
-
129
-
130
-
131
-
132
-
133
-
134
-
135
-
136
-
137
-
138
-
139
-
140
-
141
-
142
-
143
-
144
-
145
-
146
-
147
-
148
-
149
-
150
-
151
-
152
-
153
-
154
-
155
-
156
-
157
-
158
-
159
-
160
-
161
-
162
-
163
-
164
-
165
-
166
-
167
-
168
-
169
-
170
-
171
-
172
-
173
-
174
-
175
-
176
-
177
-
178
-
179
-
180
-
181
-
182
-
183
-
184
-
185
-
186
-
187
-
188
-
189
-
190
-
191
-
192
-
193
-
194
-
195
-
196
-
197
-
198
 |
 |
