Makita HR3210C Technical Reference - Page 8
] DISASSEMBLY/ASSEMBLY, 3] -2. Tool Holder epair
 |
View all Makita HR3210C manuals
Add to My Manuals
Save this manual to your list of manuals |
Page 8 highlights
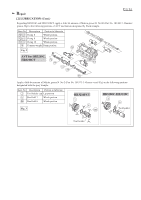
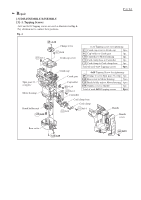
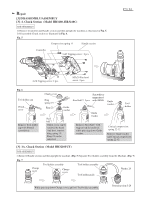
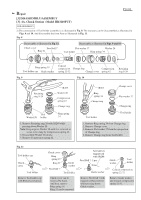
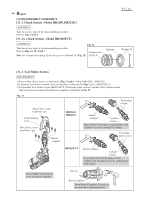
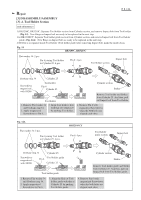
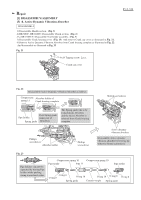
Repair [3] DISASSEMBLY/ASSEMBLY [3] -2. Tool Holder Section P 8 / 24 DISASSEMBLY 3) HR3200C, HR3210C: Separate Tool holder section from Cylinder section, and remove Impact bolt from Tool holder. (Fig. 14) Now Rings on Impact bolt are ready to be replaced in the next step. 3A) HR3210FCT: Separate Tool holder guide section from Cylinder section, and remove Impact bolt from Tool holder guide. (Fig. 14A) Now Rings on Impact bolt are ready to be replaced in the next step. 4) If Dust is recognized inside Tool holder (Tool holder guide) after removing Impact bolt, make the inside clean. Fig. 14 HR3200C, HR3210C Flat washer 34: 2 pcs. Pin 6 joining Tool holder to Cylinder 25: 4 pcs. Pin 6: 4 pcs. Tool holder section Impact bolt Urethane ring 34 Screwdriver magnetized with 1R288 Cylinder 25 Tool holder Pin 6 Cylinder 25 Tool holder 1. Remove Flat washer 34 and Urethane ring 34. 2. Apply magnetized Screwdriver to Pin 6, 3. Align Tool holder's hole with that of Cylinder 25 by pushing Tool holder. Cylinder section Striker Remove Tool holder and Striker from Cylinder 25. And then, pull out Impact bolt from Tool holder. 4. Remove Pin 6 with magnetized Screwdriver when the both holes are aligned each other. Fig. 14A Flat washer 34: 2 pcs. Pin 6 joining Tool holder to Cylinder 25: 4 pcs. HR3210FCT Pin 6: 4 pcs. Tool holder guide section Impact bolt Urethane ring 34 Cylinder 25 Screwdriver magnetized with 1R288 Pin 6 Tool holder guide Cylinder 25 Tool holder guide Cylinder section Striker Remove Tool holder guide and Striker from Cylinder 25. And then, pull out Impact bolt from Tool holder guide. 1. Remove Flat washer 34 and Urethane ring 34. 2. Apply magnetized Screwdriver to Pin 6, 3. Align the Hole of Tool holder guide with that of Cylinder 25 by pushing Tool holder guide. 4. Remove Pin 6 with magnetized Screwdriver when the both holes are aligned each other.
-
 1
1 -
2
-
 3
3 -
 4
4 -
 5
5 -
 6
6 -
 7
7 -
 8
8 -
 9
9 -
 10
10 -
 11
11 -
 12
12 -
 13
13 -
14
-
15
-
16
-
17
-
18
-
19
-
20
-
21
-
22
-
23
-
24
 |
 |
