Metabo GEP 950 G Plus Operating Instructions 4 - Page 15
Cleaning, Troubleshooting
 |
View all Metabo GEP 950 G Plus manuals
Add to My Manuals
Save this manual to your list of manuals |
Page 15 highlights
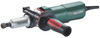
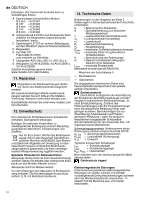
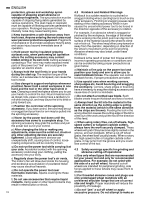
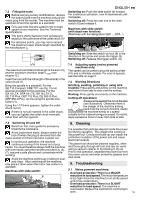
7.2 Fitting the tools Before carrying out any modifications, remove the battery pack from the machine and pull the mains plug from the socket. The machine must be switched off and the spindle at a standstill. Only use tools that are suited to the no-load speed of your machine. See the Technical Specifications. The tool's shank diameter must correspond exactly to the collet bore of the collet chuck (1)! For abrasive points, you may never exceed the maximum open shank length specified by the manufacturer l0. ENGLISH en Switching on: Push the slide switch (6) forward. For continuous activation, now tilt downwards until it engages. Switching off: Press the rear end of the slide switch (6) and release it. Machines with slide switch (with dead man function): (Machines with the designation GEP..., GPA...) 98 Switching on: Slide the switch-on lock (8) in the direction of the arrow and press the trigger (9). Switching off: Release the trigger switch. (9) I 0 I 0 lo The maximum permitted shaft length is the sum and the maximum chapter13.) insertion depth Lmax (see of l0 Insert the tool (with the full length of the shank) in the collet chuck (1). Bring the spindle to a standstill. For the GE 710 Compact, FME 737, use the 13-mm spanner provided for this purpose. For the GA 18 LTX, GPA 18 LTX, GA 18 LTX G, GE 710 Plus, GEP 710 Plus, GE 950 G Plus, GEP 950 G Plus, do this using the spindle lock button (4). Using the 17/19-mm spanner, tighten the collet chuck nut (2). If there is no tool inserted in the collet chuck, you can tighten the collet chuck manually rather than with the spanner. 7.4 Adjusting speed (mains powered machines only) The speed can be preset using the setting wheel (10) and is infinitely variable. For a list of speeds, see the table on page 3. 7.5 Working Directions Grinding, sanding, polishing or using wire brushes: Press gently and evenly on the machine and move it from side to side over the surface. Routing: Press gently and evenly on the machine. Cutting-off operations: Always work against the run of the disc (see illustration). Otherwise there is the danger of the machine kicking back from the cut out of control. Guide the machine evenly at a speed suitable for the material being processed. Do not tilt, apply excessive force or sway from side to side. 7.3 Switching On and Off 8. Cleaning Switch on first, then guide the accessory towards the workpiece. It is possible that particles deposit inside the power Avoid inadvertent starts: always switch the tool off when the plug is removed from the mains socket or if there has been a power cut. In continuous operation, the machine continues running if it is forced out of your hands. You must therefore always hold the machine with both hands using the handles provided (3), (5), (7), assume a safe stance and concentrate while working. Avoid the machine swirling up or taking in dust tool during operation. This impairs the cooling of the power tool. Conductive build-up can impair the protective insulation of the power tool and cause electrical hazards. The power tool should be cleaned regularly, often and thoroughly through all front and rear air vents using a vacuum cleaner or by blowing in dry air. Prior to this operation, separate the power tool from the power source and wear protective glasses and dust mask. and chips. After switching off the machine, only place it down when the motor has come to a 9. Troubleshooting standstill. Machines with slide switch: 9.1 Mains powered machines: - Overload protection: There is a MAJOR 6 reduction in load speed. The motor temperature is too high! Allow the machine to run at idle speed until it has cooled down. - Overload protection: There is a SLIGHT reduction in load speed. The machine is overloaded. Reduce the load before continuing to work. 15
-
 1
1 -
2
-
3
-
4
-
5
-
6
-
7
-
8
-
9
-
 10
10 -
 11
11 -
 12
12 -
 13
13 -
 14
14 -
 15
15 -
 16
16 -
 17
17 -
 18
18 -
 19
19 -
 20
20 -
21
-
22
-
23
-
24
-
25
-
26
-
27
-
28
-
29
-
30
-
31
-
32
-
33
-
34
-
35
-
36
-
37
-
38
-
39
-
40
-
41
-
42
-
43
-
44
-
45
-
46
-
47
-
48
-
49
-
50
-
51
-
52
-
53
-
54
-
55
-
56
-
57
-
58
-
59
-
60
-
61
-
62
-
63
-
64
-
65
-
66
-
67
-
68
-
69
-
70
-
71
-
72
-
73
-
74
-
75
-
76
-
77
-
78
-
79
-
80
-
81
-
82
-
83
-
84
-
85
-
86
-
87
-
88
-
89
-
90
-
91
-
92
-
93
-
94
-
95
-
96
-
97
-
98
-
99
-
100
-
101
-
102
-
103
-
104
-
105
-
106
-
107
-
108
-
109
-
110
-
111
-
112
-
113
-
114
-
115
-
116
 |
 |