NEC NP-PX800X User Manual - Page 171
NEC NP-PX800X Manual
 |
View all NEC NP-PX800X manuals
Add to My Manuals
Save this manual to your list of manuals |
Page 171 highlights
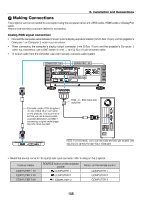
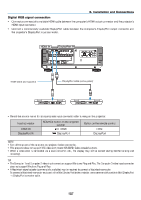
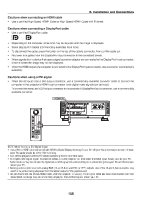
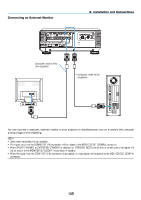
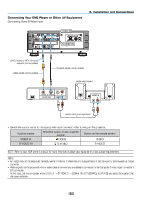
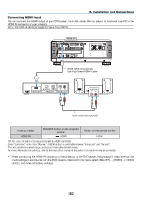
6. Installation and Connections Digital RGB signal connection • Connect a commercially available HDMI cable between the computer's HDMI output connector and the projector's HDMI input connector. • Connect a commercially available DisplayPort cable between the computer's DisplayPort output connector and the projector's DisplayPort input connector. HDMI IN DisplayPort IN HDMI cable (not supplied) DisplayPort cable (not supplied) • Select the source name for its appropriate input connector after turning on the projector. Input connector HDMI IN DisplayPort IN SOURCE button on the projector cabinet HDMI DisplayPort Button on the remote control HDMI DisplayPort NOTE: • Turn off the power of the computer and projector before connecting. • This projector does not support NEC video unit (model ISS-6020) video decoded outputs. • When a video deck is connected via a scan converter, etc., the display may not be correct during fast-forwarding and rewinding. TIP • The Computer 1 and Computer 2 video input connectors support Windows Plug and Play. The Computer 3 video input connector does not support Windows Plug and Play. • A Macintosh signal adapter (commercially available) may be required to connect a Macintosh computer. To connect a Macintosh computer equipped with a Mini DisplayPort to the projector, use a commercially available Mini DisplayPort → DisplayPort converter cable. 157
-
 1
1 -
2
-
3
-
4
-
5
-
6
-
7
-
8
-
9
-
10
-
11
-
12
-
13
-
14
-
15
-
16
-
17
-
18
-
19
-
20
-
21
-
22
-
23
-
24
-
25
-
26
-
27
-
28
-
29
-
30
-
31
-
32
-
33
-
34
-
35
-
36
-
37
-
38
-
39
-
40
-
41
-
42
-
43
-
44
-
45
-
46
-
47
-
48
-
49
-
50
-
51
-
52
-
53
-
54
-
55
-
56
-
57
-
58
-
59
-
60
-
61
-
62
-
63
-
64
-
65
-
66
-
67
-
68
-
69
-
70
-
71
-
72
-
73
-
74
-
75
-
76
-
77
-
78
-
79
-
80
-
81
-
82
-
83
-
84
-
85
-
86
-
87
-
88
-
89
-
90
-
91
-
92
-
93
-
94
-
95
-
96
-
97
-
98
-
99
-
100
-
101
-
102
-
103
-
104
-
105
-
106
-
107
-
108
-
109
-
110
-
111
-
112
-
113
-
114
-
115
-
116
-
117
-
118
-
119
-
120
-
121
-
122
-
123
-
124
-
125
-
126
-
127
-
128
-
129
-
130
-
131
-
132
-
133
-
134
-
135
-
136
-
137
-
138
-
139
-
140
-
141
-
142
-
143
-
144
-
145
-
146
-
147
-
148
-
149
-
150
-
151
-
152
-
153
-
154
-
155
-
156
-
157
-
158
-
159
-
160
-
161
-
162
-
163
-
164
-
165
-
 166
166 -
 167
167 -
 168
168 -
 169
169 -
 170
170 -
 171
171 -
 172
172 -
 173
173 -
 174
174 -
 175
175 -
 176
176 -
177
-
178
-
179
-
180
-
181
-
182
-
183
-
184
-
185
-
186
-
187
-
188
-
189
-
190
-
191
-
192
-
193
-
194
-
195
-
196
-
197
-
198
-
199
-
200
-
201
-
202
-
203
-
204
-
205
-
206
-
207
-
208
-
209
-
210
-
211
-
212
-
213
-
214
-
215
-
216
-
217
-
218
-
219
-
220
-
221
-
222
-
223
-
224
-
225
-
226
-
227
-
228
-
229
-
230
-
231
-
232
-
233
-
234
-
235
-
236
-
237
-
238
-
239
-
240
-
241
-
242
-
243
-
244
 |
 |
