NEC NP-PX800X User Manual - Page 62
NEC NP-PX800X Manual
 |
View all NEC NP-PX800X manuals
Add to My Manuals
Save this manual to your list of manuals |
Page 62 highlights
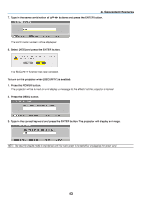
3. Convenient Features TIP: To call up the adjusted values from [LENS MEMORY]: 1. From the menu, select [ADJUST] → [LENS MEMORY] → [MOVE] and press the ENTER button. The confirmation screen will be displayed. 2. Press the ◀ button to select and [YES] and press the ENTER button. The adjusted values stored in [LENS MEMORY] will be applied to the current signal. To automatically apply the adjusted values at the time of source selection: 1. From the menu, select [SETUP] → [REF. LENS MEMORY] → [LOAD BY SIGNAL] and press the ENTER button. 2. Press the v button to select and [ON] and press the ENTER button. This will move the lens automatically to the position at the time of source selection according to the adjusted values. NOTE: The Lens Memory function may not produce a completely aligned image (due to tolerances in the lenses) using the adjusted values stored in the projector. After calling up and applying the adjusted values from the Lens Memory function, finely adjust the lens shift, zoom and focus to produce the best possible image. 48
-
 1
1 -
2
-
3
-
4
-
5
-
6
-
7
-
8
-
9
-
10
-
11
-
12
-
13
-
14
-
15
-
16
-
17
-
18
-
19
-
20
-
21
-
22
-
23
-
24
-
25
-
26
-
27
-
28
-
29
-
30
-
31
-
32
-
33
-
34
-
35
-
36
-
37
-
38
-
39
-
40
-
41
-
42
-
43
-
44
-
45
-
46
-
47
-
48
-
49
-
50
-
51
-
52
-
53
-
54
-
55
-
56
-
 57
57 -
 58
58 -
 59
59 -
 60
60 -
 61
61 -
 62
62 -
 63
63 -
 64
64 -
 65
65 -
 66
66 -
 67
67 -
68
-
69
-
70
-
71
-
72
-
73
-
74
-
75
-
76
-
77
-
78
-
79
-
80
-
81
-
82
-
83
-
84
-
85
-
86
-
87
-
88
-
89
-
90
-
91
-
92
-
93
-
94
-
95
-
96
-
97
-
98
-
99
-
100
-
101
-
102
-
103
-
104
-
105
-
106
-
107
-
108
-
109
-
110
-
111
-
112
-
113
-
114
-
115
-
116
-
117
-
118
-
119
-
120
-
121
-
122
-
123
-
124
-
125
-
126
-
127
-
128
-
129
-
130
-
131
-
132
-
133
-
134
-
135
-
136
-
137
-
138
-
139
-
140
-
141
-
142
-
143
-
144
-
145
-
146
-
147
-
148
-
149
-
150
-
151
-
152
-
153
-
154
-
155
-
156
-
157
-
158
-
159
-
160
-
161
-
162
-
163
-
164
-
165
-
166
-
167
-
168
-
169
-
170
-
171
-
172
-
173
-
174
-
175
-
176
-
177
-
178
-
179
-
180
-
181
-
182
-
183
-
184
-
185
-
186
-
187
-
188
-
189
-
190
-
191
-
192
-
193
-
194
-
195
-
196
-
197
-
198
-
199
-
200
-
201
-
202
-
203
-
204
-
205
-
206
-
207
-
208
-
209
-
210
-
211
-
212
-
213
-
214
-
215
-
216
-
217
-
218
-
219
-
220
-
221
-
222
-
223
-
224
-
225
-
226
-
227
-
228
-
229
-
230
-
231
-
232
-
233
-
234
-
235
-
236
-
237
-
238
-
239
-
240
-
241
-
242
-
243
-
244
 |
 |
