NEC NP-PX800X User Manual - Page 37
NEC NP-PX800X Manual
 |
View all NEC NP-PX800X manuals
Add to My Manuals
Save this manual to your list of manuals |
Page 37 highlights
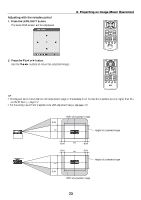
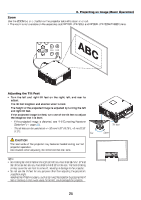
2. Projecting an Image (Basic Operation) Adjusting with the remote control 1. Press the LENS SHIFT button. The Lens Shift screen will be displayed. 2. Press the ▼▲◀ or ▶ button. Use the buttons to move the projected image. TIP: • The diagram below shows the lens shift adjustment range for the desktop front. To raise the projection position higher than this, use the tilt feet. (→ page 25) • For the ceiling mount/front projection lens shift adjustment range, see page 208. Width of projected image 0.5V 1V Height of projected image 0.1H 0.1H 1H 0.1H 0.1H 1H Height of projected image 1V 0.5V Width of projected image 23
-
 1
1 -
2
-
3
-
4
-
5
-
6
-
7
-
8
-
9
-
10
-
11
-
12
-
13
-
14
-
15
-
16
-
17
-
18
-
19
-
20
-
21
-
22
-
23
-
24
-
25
-
26
-
27
-
28
-
29
-
30
-
31
-
 32
32 -
 33
33 -
 34
34 -
 35
35 -
 36
36 -
 37
37 -
 38
38 -
 39
39 -
 40
40 -
 41
41 -
 42
42 -
43
-
44
-
45
-
46
-
47
-
48
-
49
-
50
-
51
-
52
-
53
-
54
-
55
-
56
-
57
-
58
-
59
-
60
-
61
-
62
-
63
-
64
-
65
-
66
-
67
-
68
-
69
-
70
-
71
-
72
-
73
-
74
-
75
-
76
-
77
-
78
-
79
-
80
-
81
-
82
-
83
-
84
-
85
-
86
-
87
-
88
-
89
-
90
-
91
-
92
-
93
-
94
-
95
-
96
-
97
-
98
-
99
-
100
-
101
-
102
-
103
-
104
-
105
-
106
-
107
-
108
-
109
-
110
-
111
-
112
-
113
-
114
-
115
-
116
-
117
-
118
-
119
-
120
-
121
-
122
-
123
-
124
-
125
-
126
-
127
-
128
-
129
-
130
-
131
-
132
-
133
-
134
-
135
-
136
-
137
-
138
-
139
-
140
-
141
-
142
-
143
-
144
-
145
-
146
-
147
-
148
-
149
-
150
-
151
-
152
-
153
-
154
-
155
-
156
-
157
-
158
-
159
-
160
-
161
-
162
-
163
-
164
-
165
-
166
-
167
-
168
-
169
-
170
-
171
-
172
-
173
-
174
-
175
-
176
-
177
-
178
-
179
-
180
-
181
-
182
-
183
-
184
-
185
-
186
-
187
-
188
-
189
-
190
-
191
-
192
-
193
-
194
-
195
-
196
-
197
-
198
-
199
-
200
-
201
-
202
-
203
-
204
-
205
-
206
-
207
-
208
-
209
-
210
-
211
-
212
-
213
-
214
-
215
-
216
-
217
-
218
-
219
-
220
-
221
-
222
-
223
-
224
-
225
-
226
-
227
-
228
-
229
-
230
-
231
-
232
-
233
-
234
-
235
-
236
-
237
-
238
-
239
-
240
-
241
-
242
-
243
-
244
 |
 |

23
2. Projecting an Image (Basic Operation)
Adjusting with the remote control
1. PresstheLENSSHIFTbutton.
The Lens Shift screen will be displayed.
2. Press the
▼▲◀
or
▶
button.
Use the
▼▲◀▶
buttons to move the projected image.
TIP:
• Thediagrambelowshowsthelensshiftadjustmentrangeforthedesktopfront.Toraisetheprojectionpositionhigherthanthis,
usethetiltfeet.(
→
page
25
)
• Fortheceilingmount/frontprojectionlensshiftadjustmentrange,seepage
20
8
.
1V
1H
0.1H
0.1H
0.5V
Height of projected image
Width of projected image
1V
1H
0.1H
0.1H
0.5V
Height of projected image
Width of projected image