NEC NP-PX800X User Manual - Page 191
NEC NP-PX800X Manual
 |
View all NEC NP-PX800X manuals
Add to My Manuals
Save this manual to your list of manuals |
Page 191 highlights
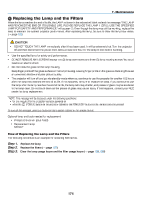
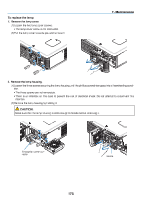
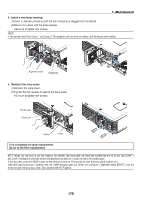
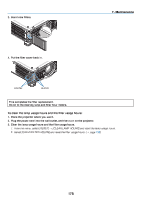
7. Maintenance Replacing the Filters There are two filters, one located at the front of the projector and one on the side. Optional filters (two filter) are available. Small one for the front Large one for the left side NOTE: • Replace both filters with the new ones at the same time. • Before replacing the filters, use a vacuum cleaner to vacuum dust and dirt from the vents (inlet) of the projector and use a dry soft cloth to wipe dust off the cabinet. • The projector contains high-precision parts. Keep out dust and dirt during filter replacement. • Do not wash the filter with water. Water will damage the filter membrane. • Attach the filter in the correct orientation. Failure to do so may cause dust and dirt to enter inside the projector, resulting in projector malfunction. Filter cover Inlet (The large filter is inside.) Filter cover Inlet (The small filter is inside) To replace the filters: 1. Push the positions shown (2 locations) to release the filter cover and remove it. Buttons Filter cover 2. Remove the two filters by pulling out. Filter unit 177
-
 1
1 -
2
-
3
-
4
-
5
-
6
-
7
-
8
-
9
-
10
-
11
-
12
-
13
-
14
-
15
-
16
-
17
-
18
-
19
-
20
-
21
-
22
-
23
-
24
-
25
-
26
-
27
-
28
-
29
-
30
-
31
-
32
-
33
-
34
-
35
-
36
-
37
-
38
-
39
-
40
-
41
-
42
-
43
-
44
-
45
-
46
-
47
-
48
-
49
-
50
-
51
-
52
-
53
-
54
-
55
-
56
-
57
-
58
-
59
-
60
-
61
-
62
-
63
-
64
-
65
-
66
-
67
-
68
-
69
-
70
-
71
-
72
-
73
-
74
-
75
-
76
-
77
-
78
-
79
-
80
-
81
-
82
-
83
-
84
-
85
-
86
-
87
-
88
-
89
-
90
-
91
-
92
-
93
-
94
-
95
-
96
-
97
-
98
-
99
-
100
-
101
-
102
-
103
-
104
-
105
-
106
-
107
-
108
-
109
-
110
-
111
-
112
-
113
-
114
-
115
-
116
-
117
-
118
-
119
-
120
-
121
-
122
-
123
-
124
-
125
-
126
-
127
-
128
-
129
-
130
-
131
-
132
-
133
-
134
-
135
-
136
-
137
-
138
-
139
-
140
-
141
-
142
-
143
-
144
-
145
-
146
-
147
-
148
-
149
-
150
-
151
-
152
-
153
-
154
-
155
-
156
-
157
-
158
-
159
-
160
-
161
-
162
-
163
-
164
-
165
-
166
-
167
-
168
-
169
-
170
-
171
-
172
-
173
-
174
-
175
-
176
-
177
-
178
-
179
-
180
-
181
-
182
-
183
-
184
-
185
-
 186
186 -
 187
187 -
 188
188 -
 189
189 -
 190
190 -
 191
191 -
 192
192 -
 193
193 -
 194
194 -
 195
195 -
 196
196 -
197
-
198
-
199
-
200
-
201
-
202
-
203
-
204
-
205
-
206
-
207
-
208
-
209
-
210
-
211
-
212
-
213
-
214
-
215
-
216
-
217
-
218
-
219
-
220
-
221
-
222
-
223
-
224
-
225
-
226
-
227
-
228
-
229
-
230
-
231
-
232
-
233
-
234
-
235
-
236
-
237
-
238
-
239
-
240
-
241
-
242
-
243
-
244
 |
 |
