NEC PX-42M3A PlasmaSync 4200W - Page 18
Basic Operations
 |
View all NEC PX-42M3A manuals
Add to My Manuals
Save this manual to your list of manuals |
Page 18 highlights
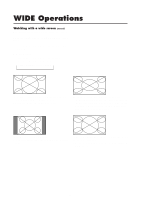
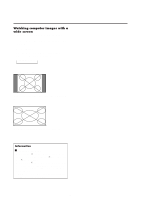
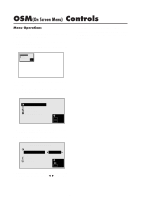
Basic Operations POWER To turn the unit ON and OFF: 1. Plug the power cord into an active AC power outlet. 2. Press the POWER button (on the remote controller) to turn on. The monitor's POWER/STANDBY indicator will light up(green) when the unit is on. 3. Press the POWER button (on the remote controller or the unit) to turn off. The monitor's POWER/STANDBY indicator turns red and the standby mode is set. VOLUME To adjust the volume: 1. Press and hold the VOLUME v button (on the remote controller or the unit) to increase to the desired level. 2. Press and hold the VOLUME w button (on the remote controller or the unit) to decrease to the desired level. MUTE To cancel the sound: Press the MUTE button on the remote controller to cancel sound; press again to restore. DISPLAY To check the settings: 1. The screen changes each time the DISPLAY button is pressed. 2. If the button is not pressed for approximately three seconds, the menu turn off. VISUAL CONTROL TO adjust the picture's contrast: 1, Press and hold the CONTRAST v button for higher contrast. 2, Press and hold the CONTRAST w button for lower contrast. TO adjust the picture's brightness: 1, Press and hold the BRIGHT v button for a brighter picture. 2, Press and hold the BRIGHT w button for a darker pic- ture. TO adjust the picture's color: 1, Press and hold the COLOR v button for more color saturation. 2, Press and hold the COLOR w button for less color satu- ration. TO adjust the picture's tint (NTSC only): 1, Press and hold the TINT v button for a greener tint. 2, Press and hold the TINT w button for a redder tint. TO adjust the picture's sharpness: 1, Press and hold the SHARPNESS v button for a sharper picture. 2, Press and hold the SHARPNESS w button for a softer picture. *If no key operation is made within five seconds, the OSM display will disappear. 13
-
 1
1 -
2
-
3
-
4
-
5
-
6
-
7
-
8
-
9
-
10
-
11
-
12
-
 13
13 -
 14
14 -
 15
15 -
 16
16 -
 17
17 -
 18
18 -
 19
19 -
 20
20 -
 21
21 -
 22
22 -
 23
23 -
24
-
25
-
26
-
27
-
28
-
29
-
30
-
31
-
32
-
33
-
34
-
35
-
36
-
37
-
38
-
39
-
40
-
41
-
42
-
43
-
44
 |
 |